
Introduction:
Before we get to plumber, we need to define the thing plumber is all about; the Application Programming Interface, better known for or abbreviated as (API). APIs play the middle man (the engine under the hood) role, allowing different applications to talk to each other. For example, we use an API whenever we send a message on Facebook, request a taxi via Uber, or order food from a restaurant’s website. It is a messenger that carries requests from the client (application/software/tool) to the server (provider) and returns the corresponding responses.
A good analogy could be that of a waiter working in a restaurant. The waiter (the API or the messenger) is the middle man between you (the client) and the kitchen (the server); they take your order, pass it to the kitchen, and deliver your food once it’s ready. A more computer-related example of an API in play is searching for airline tickets. To complete your search, you must provide the departure city, destination city, and travelling dates. The search engine (representing you, the client) then communicates with the relevant airlines’ websites (one or more servers) via their respective APIs (messengers) to send through your queries and return their responses before you can book your flight.
So what is the relationship between plumber and APIs? Plumber is an “API generator for R”. Based on plumber’s website,
“Plumber allows you to create a web API by merely decorating your existing R source code with
roxygen2-like comments.”
In this post, we will:
- discuss the relevance to HTA,
- install plumber in R,
- explain how to build a simple
plumberpowered API, - discuss a few more points about API methods,
- demonstrate running the API,
- discuss deployment venues, and
- discuss programmatic interaction.
Relevance, prerequisites and difficulty:
Relevance:
Smith et al. (2022)1 covered the usefulness of APIs in general and their applications in the Health Technology Appraisal (HTA) paradigm. Also, it is excellent that this paper is open source and contains an HTA-related application for everyone interested in visualising the use of APIs in this field.
Difficulty:
We developed this tutorial with beginner users in mind. However, readers are not expected to have prior R knowledge and should be able to follow through with the tutorial.
Prerequisites:
You must have R2 installed to follow through with this tutorial. Please see here for more details. On the other hand, while it is optional, it helps if you have RStudio installed. However, any IDE, or non, would still work fine.
You can also find the complete code we are using in this tutorial in the “getting-started-with-plumber” folder on my GitHub repository.
Installing and loading the plumber package:
Installing plumber is not different from installing most other R packages 3. You are good to go if you have installed a package in R before. However, if this is your first time or you do not mind the reminder, then the code to install plumber in R is below (remember to execute the following code in the “Console”)
1
install.packages("plumber")
Now that we installed the plumber package, we can load it into our R session by running the library() command.
1
library(plumber)
Building a simple API using plumber:
The plumber package requires the user to define their API and its methods in a standalone file which is then deployed (for the lack of a better word) by the package, as we will see below.
There are a few key elements to building a plumber-powered API.
- define the API and its methods or functions in a standalone “.R” file (for example “fileName.R”),
- use the
roxygen2[#]** orroxygen2`-like **[#*] comment handlers (the symbols inside the square brackets) to define the API parts, and - host or run the API using the command:
1
2
  pr("fileName.R") %>%
      pr_run(port=8000)
We have adapted the following examples code from the examples shown on plumber’s website. You can find the file “plumber.R” in the “getting-started-with-plumber” folder on my GitHub repository.
1. Provide a brief description of the API:
We start by providing a brief description of the API. This description and methods/functions descriptions will be utilised by Swagger4 to generate API documentation automatically. This documentation is handy as it will help prospective users understand how to interact with the API.
1
2
3
4
5
6
7
8
#* @apiTitle Getting started with plumber
#*
#* @apiDescription Welcome to this demo API which was built to introduce
#* first time plumber-powered API developers to the process. The idea behind
#* these few lines are to populate Swagger auto-generated documentation which
#* can be later accessed by the sub-domain (_docs_/) or (\_docs\_/) in case
#* you do not see the underscore before and after the term "docs".
#* For example (http://127.0.0.1:0000/\_docs\_/).
For the API description to show in the right place, please drop the above code chunk at the bottom of the API file, i.e. put all succeeding API functions before the preceding code chunk.
2. Write our first function:
Our first API function is a simple one. It will take a user name as input and echo back a welcoming message to the API.
In the code chunk below we:
- gave our function a name Welcome user,
- added a brief description for the API method “The API says Hi”
- defined the input parameter userName using the @param label,
- described the userName parameter “The user’s name”,
- chose a GET method using the @get label,
- defined the API endpoint “/echo”, and
- defined the “echo” function.
1
2
3
4
5
6
7
#* Welcome user.
#* The API says "Hi".
#* @param userName The user's name
#* @get /echo
function(userName="") {
  list(msg = paste0("Welcome to your first API, '", userName, "'"))
}
3. Define a method that returns an image:
Our second method is also from class GET; however, we want this one to return an image. To accomplish this, we use a serializer to let the API know what we expect from this GET method. Therefore, unlike the previous code chunk we:
- defined the function output that the API will return using the @serializer label, and
- declared that the output type (or file extension) is an image “png”. Notice that this function requires no inputs from the user.
1
2
3
4
5
6
7
8
9
10
#* Draw a scatter plot.
#* This function will generate a scatter plot from 1000 randomly
#* sampled pairs of values.
#* @serializer png
#* @get /plot
function() {
  Random_1 <- rnorm(1000)
  Random_2 <- rnorm(1000)
  plot(Random_1, Random_2)
}
4. Define a method that returns an image:
The only notable thing about our last function is that it requires two numerical inputs. Therefore, below we:
- defined parameters
aandbusing the @param label.
1
2
3
4
5
6
7
8
#* Multiply numbers.
#* Return the multiplication of two numbers
#* @param a The first number
#* @param b The second number
#* @post /multiply
function(a, b) {
  as.numeric(a) * as.numeric(b)
}
More on API methods:
As discussed earlier, plumber converts R functions to API endpoints. Each endpoint expects a particular type of request, serves a specific function and sends a specific response.
APIs can be manipulated or called by several HTTP request methods (verbs). Above, we saw two methods in use, GET and POST. The other most commonly used verbs are PUT, PATCH, and DELETE, which correspond to create (POST and PUT), read (GET), update (PATCH), and delete (DELETE) operations. You can read more about these here or here.
Testing the simple API:
There are a few ways to test a plumber built API. However, we will stick to the simplest one in this post. But we promise to explore some more exciting ways in subsequent posts.
If you happen to use one of the recent versions of the most common Integrated Development Environment (IDE) for R, RStudio, then testing this API could not be easier. Let’s go through the steps, one at a time. To test our simple API:
- copy the above four code chunks into a new file,
- save the file as
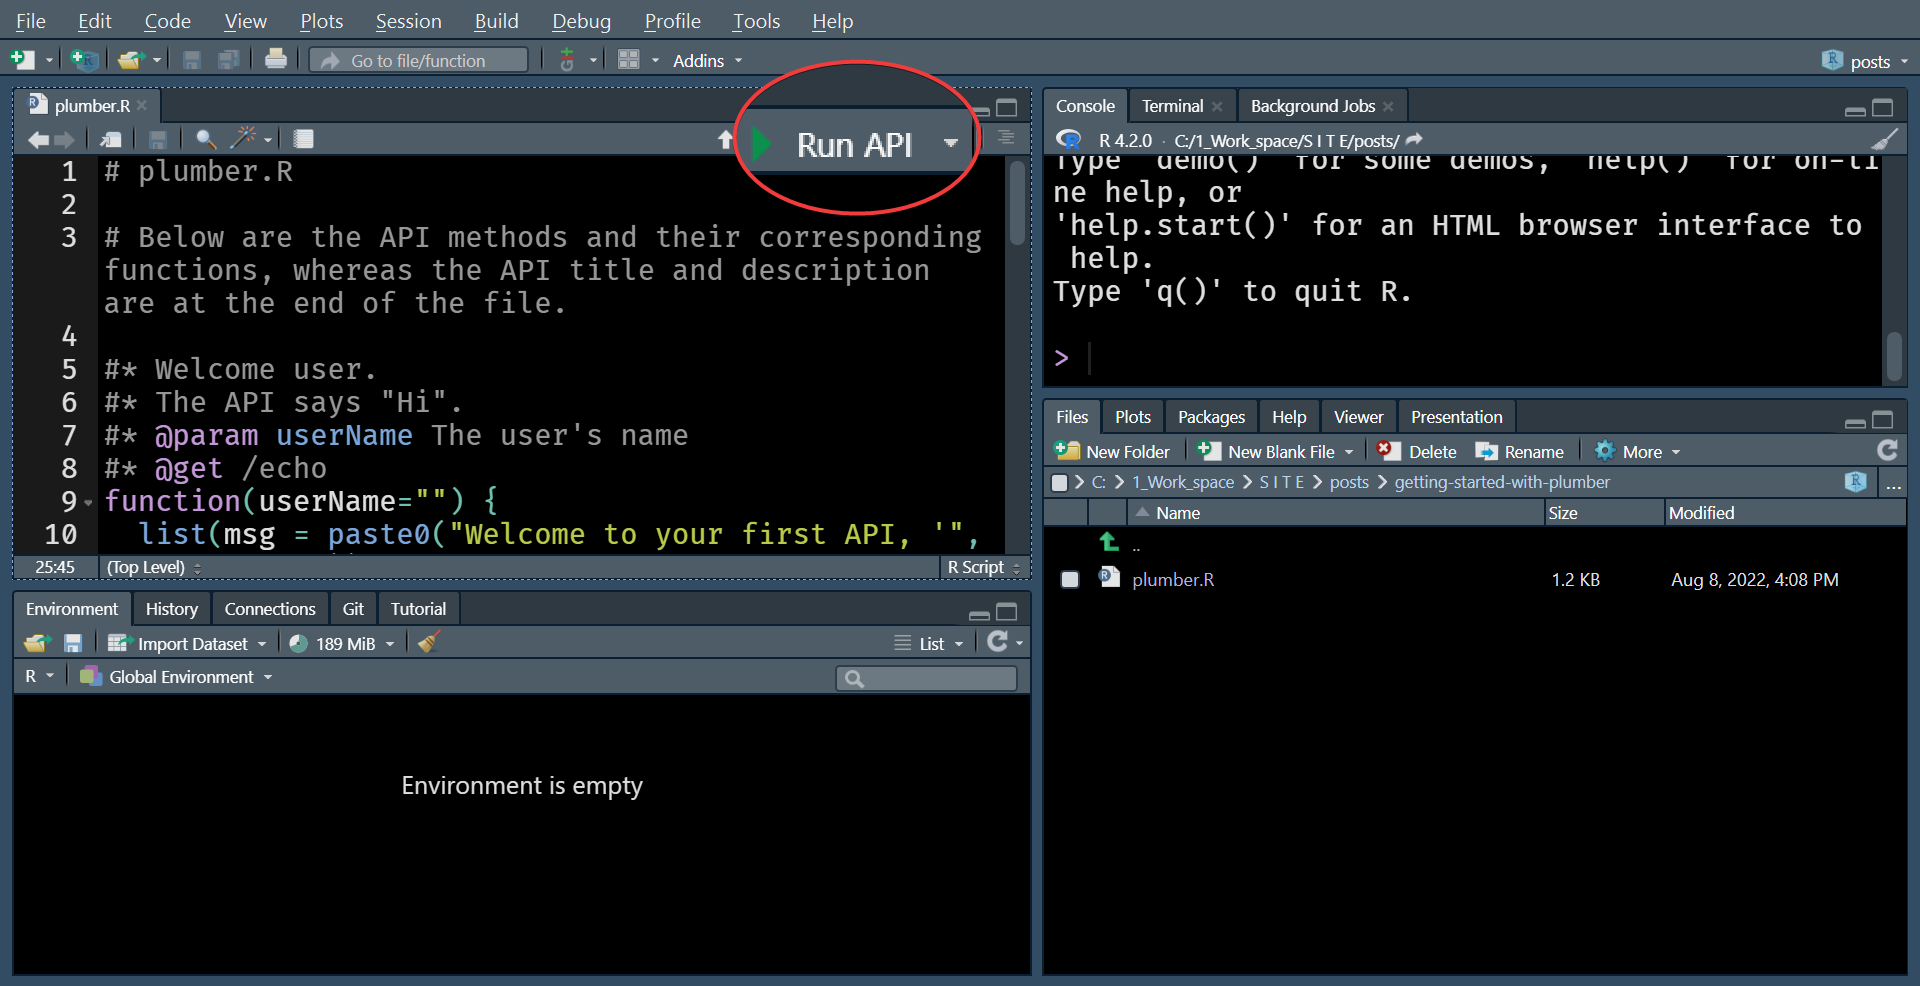
plumber.R, and - if you have successfully installed and loaded the
plumberpackage as described above, then you should see a “Run API” button on the top right corner of the “Source” pane. The “Source” pane is where the file containing the code is displayed).![runAPI]() Pressing the “Run API” button launches the API locally, and you should see the
Pressing the “Run API” button launches the API locally, and you should see the Swaggergenerated documentation show on a web browser page.![swagger_page]()
- If you do not use
RStudio, you can run the following commands inR’s, or other IDE’s, console. Remember to replace'getting-started-with-plumber/plumber.R'with your file name and destination.
 Pressing the “Run API” button launches the API locally, and you should see the
1
2
pr("getting-started-with-plumber/plumber.R") %>%
    pr_run(port=8000)
The following code chunk will also work, but you will not be able to specify the port as in the code chunk above.
1
plumber::plumb(file='getting-started-with-plumber/plumber.R')$run()
Now that our API runs locally let’s test the methods or functions. The easiest way is via the Swagger documentation page. We have recorded a demo of this interaction in the following gif.
 |
|---|
Our first plumber API running on a local R session |
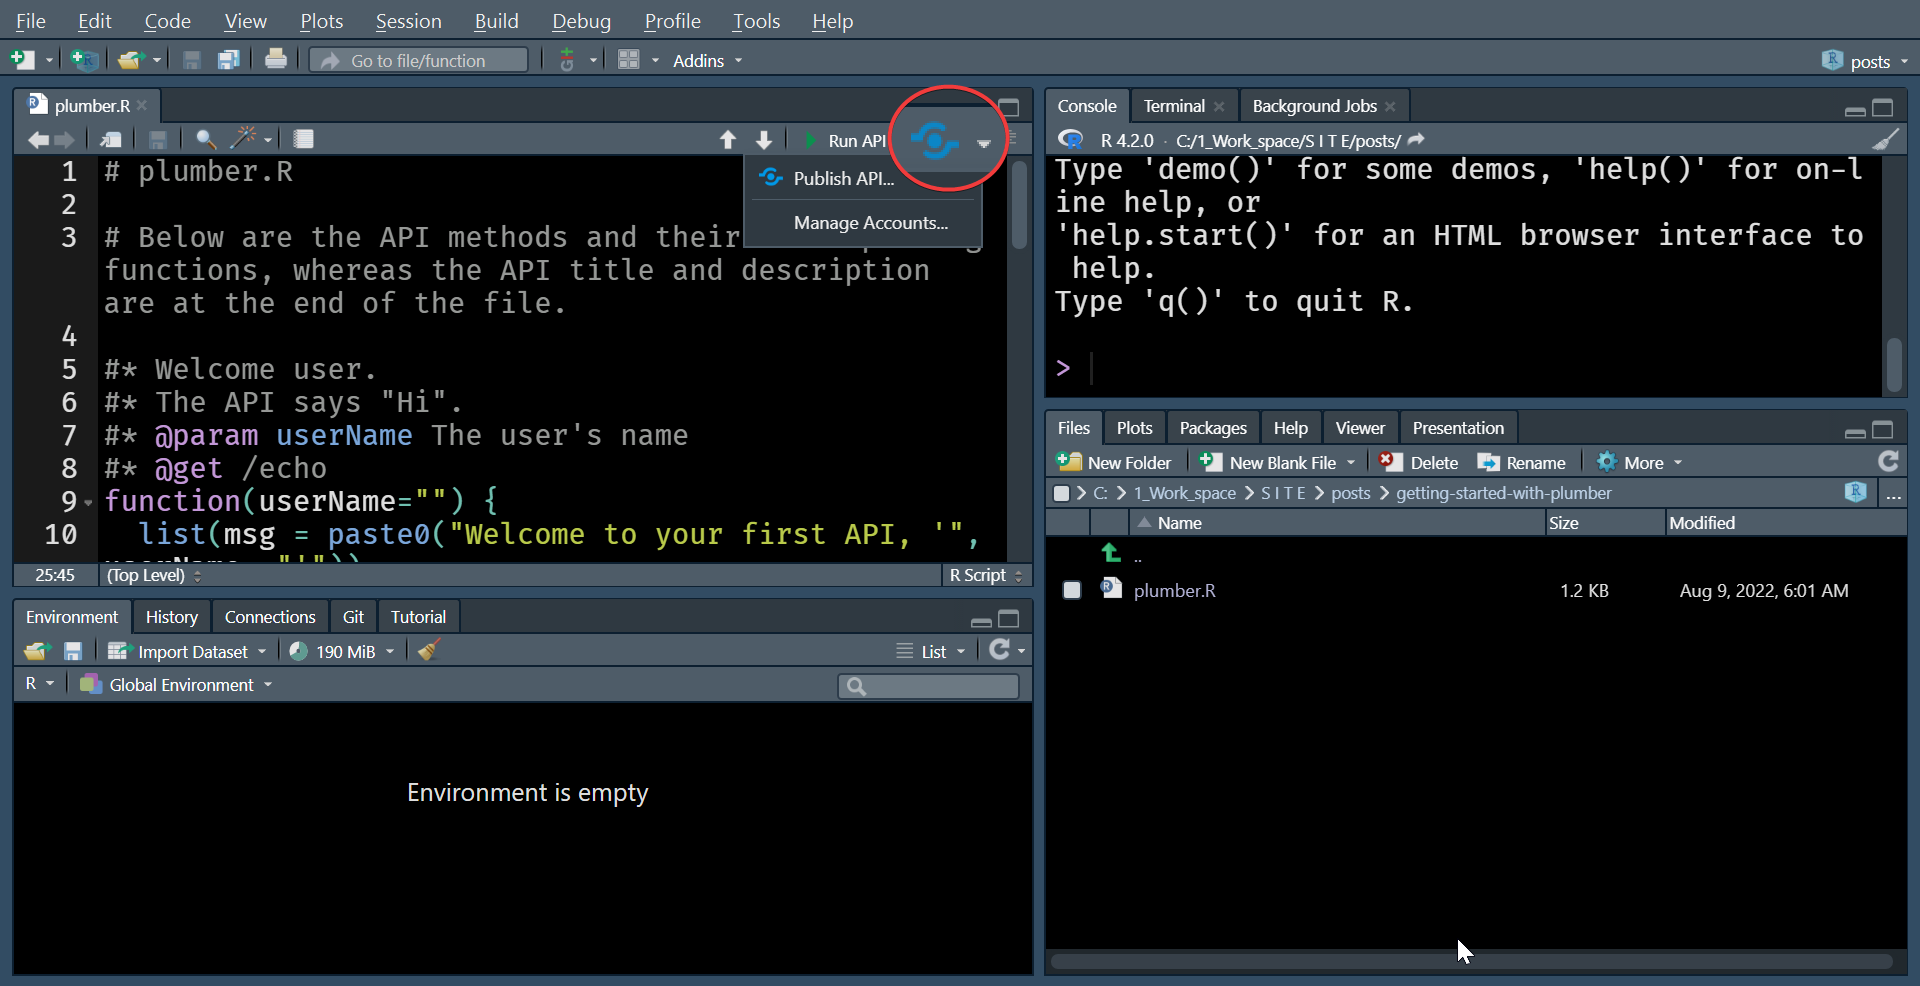
Deploying the API:
There are a few ways to deploy an API. RStudio users have a dedicated “Publish API” button that deploys the API to their commercial platform RStudio Connect.
There are a few other ways to deploy an API, but those would require some more technical knowledge. Therefore, we will discuss one or more of these venues in a separate post.
 |
|---|
| Publishing an API to RStudio Connect |
Interacting with the API programmatically:
Programmatic access or programmatic interaction is when a software or a tool, including user-defined R functions, manipulates the API. This feature allows whatever functionality or data hosted or provided by the API to be utilised by the program, script or function that triggered it.
We can demonstrate the simplest form of programmatic access by using the Command Prompt or PowerShell (in Windows machines). While in the gif below, we do not use the API’s responses in the best form of how programmatic interaction is valuable, it still helps paint a picture until we are ready to raise the complexity bar a bit higher.
 |
|---|
| Interacting with an API programmatically |
To interact with the locally hosted plumber-powered API via the Command Prompt, we use the “curl” command, which stands for client URL. In the git above we,
- ran the API on a local
Rsession using the first of the commands mentioned earlier, - opened Command Prompt by searching for “cmd” on the Windows “Start menu”,
- triggered the “echo” endpoints, providing “Wael” as the value for the “userName” parameter by running
curl "http://localhost:8000/echo?userName=Wael", and - accessed the “multiply” endpoints, providing the values for the two parameters (a and b), by executing
curl --data "a=4&b=5" "http://localhost:8000/multiply".
We will need to learn about one more package to demonstrate the more sophisticated, programmatic access in R. However, to keep this post at a low level of complexity, we will cover programmatic access in a separate post.
Conclusion:
In this post, we covered briefly introduced APIs and signposted their relevance in the field. We also managed to create and test an API for a simple set of operations. While we have kept the level of complexity low, you can create an API serving a sophisticated set of functions using these simple steps. Smith et al. (2022) provide a great example of employing API in HTA.
In one of our upcoming plumber-powered API posts, we will use the code by Smith et al. (2022) to demonstrate adding security layers to control access to API endpoints.
Code:
Below is a copy of the code in the file “plumber.R”.
1
2
3
4
5
6
7
8
9
10
11
12
13
14
15
16
17
18
19
20
21
22
23
24
25
26
27
28
29
30
31
32
33
34
35
36
37
38
39
40
41
42
# plumber.R

# Below are the API methods and their corresponding functions,
# whereas the API title and description are at the end of the file.

#* Welcome user.
#* The API says "Hi".
#* @param userName The user's name
#* @get /echo
function(userName="") {
  list(msg = paste0("Welcome to your first API, '", userName, "'"))
}

#* Draw a scatter plot.
#* This function will generate a scatter plot from 1000 randomly
#* sampled pairs of values.
#* @serializer png
#* @get /plot
function() {
  Random_1 <- rnorm(1000)
  Random_2 <- rnorm(1000)
  plot(Random_1, Random_2)
}

#* Multiply numbers.
#* Return the multiplication of two numbers.
#* @param a The first number
#* @param b The second number
#* @post /multiply
function(a, b) {
  as.numeric(a) * as.numeric(b)
}

#* @apiTitle Getting started with plumber
#*
#* @apiDescription Welcome to this demo API which was built to introduce
#* first time plumber-powered API developers to the process. The idea behind
#* these few lines are to populate Swagger auto-generated documentation which
#* can be later accessed by the sub-domain (_docs_/) or (\_docs\_/) in case
#* you do not see the underscore before and after the term "docs".
#* For example (http://127.0.0.1:0000/\_docs\_/).
#*
Sources:
- Living HTA paper
- What is
R - What is an API?
- Plumber
- Another simple plumber API
- What is Swagger?
- Plumber Serializers
- RStudio IDE
- API endpoints
Smith RA, Schneider PP and Mohammed W. Living HTA: Automating Health Economic Evaluation with R. Wellcome Open Res 2022, 7:194 (https://doi.org/10.12688/wellcomeopenres.17933.2). ↩
“
Ris a free software environment for statistical computing and graphics”We say most because some
Rpackages require other software (libraries in the case ofLinux) to be installed. ↩“Swagger allows you to describe the structure of your APIs so that machines can read them. The ability of APIs to describe their own structure is the root of all awesomeness in Swagger. Why is it so great? Well, by reading your API’s structure, we can automatically build beautiful and interactive API documentation.”