
Introduction:
We often build or write a piece of code for a decision-analytic model or some automated analysis that we intend to distribute or share with prospective users or project colleagues. There are also times when we collaborate with others in building decision-analytic models. Unfortunately, the settings on which we create or develop the software or code are usually different, sometimes significantly, from the system(s) to or with which we are collaborating, shipping or sharing. Some programming languages have partial solutions to this systems-discrepancy problem. For example, R has the package renv, which creates a project-local environment to help ensure reproducibility. However, the results generated by a particular R script might depend on “the operating system itself, the versions of system libraries in use, the compiler(s) used to compile R and the R packages used”.
On the other hand, there are times when we want to isolate or control access to specific resources, sensitive data or proprietary tools/software/code. Doing so using physical resources is inefficient, whereas virtual systems are an efficient option in contrast.
In this post, we will:
- discuss the relevance to HTA,
- define some terms and concepts,
- install Docker’s desktop’s client, and
- build, run and interact with a docker container.
Relevance, prerequisites and difficulty:
Relevance:
The issue at hand, and the solutions we will discuss below, are most relevant in Health Technology Appraisal (HTA) projects that involve model-based economic evaluation. Virtual machines (VMs) and containers allow modellers to develop decision-analytic models in environments fully separated from their physical systems. Consequently, modellers can:
- efficiently utilise cross-platform tools (For example,
Linuxis often the goto operating system (OS) to develop Agent-Based models (ABM)s using theC++library RepastHPC. VMs allow modellers using Windows OS to use RepastHPC on an isolated environment without the need to installLinuxon their physical machines.), - quickly deploy related products (For example, we can develop and deploy Shiny1-powered web applications that we occasionally use to collect data or report modelling results, using a container.), and
- easily collaborate (For example, collaborators can join a project developed in a container with minor, if any, considerations to their machine setup.).
Difficulty:
While we have tried to bring down the technicality in this post, it is fair to say that this tutorial is of “intermediate” difficulty. However, worry not; this warning highlights that it might take us some time to digest the new information outlined below. Moreover, we have covered most, if not all, the basics that should get the uninitiated up and ready.
Prerequisites:
No specific knowledge is required to go through this tutorial, but users with prior coding skills will find it much easier to follow through. However, we must emphasise that we wrote this tutorial on a Windows 10 machine. Therefore, we will highlight points where we expect other OSs to diverge with links to relevant resources where possible.
Also, it is essential to point out that we are using Windows PowerShell to call the code shown in this post. While most of the code scripted below might run successfully in the Command Prompt, at least one did not.
Terms and concepts:
Virtual Machines (VM)s
VMs are virtual systems created using software on a physical computer to emulate the functionality of physical computers. They virtualise (emulate) low-level computer hardware on top of which they run a complete OS. In other words, VMs are fully operational virtual computers separately running on a physical computer. Running the same VM image (snapshot) results in the same system regardless of the physical computer hosting it2.
The key advantages of VMs are that:
- they run in isolation from the host physical computer and its OS, providing complete isolation security, and
- once the basic hardware definitions are specified, the user can install the software manually like any other computer allowing interactive development.
However, VMs suffer from a few caveats.
- Building VMs is time-consuming since they run fully operational OSs.
- VMs can quickly run down host machine disk storage as they grow in size quickly.
For those interested in using VMs, we recommend Virtualbox, a free and open source VM provider developed by Oracle.
Containers:
In comparison, containers are3
“… lightweight software packages that contain all the dependencies required to execute the contained software application. These dependencies include things like system libraries, external third-party code packages, and other operating system level applications.”
The two main advantage of containers is that they:
- are lightweight, hence very fast to modify, recreate and rerun, and
- have a robust ecosystem that supports sharing and shipping or deployment.
Nevertheless, containers are not flawless; they “all share the same underlying hardware system below the operating system layer, it is possible that an exploit in one container could break out and affect the shared hardware.”3
Containers require an engine to operate.
“Container engines refer to the software components that enable the host OS to act as a container host. A container engine accepts user commands to build, start, and manage containers through client tools (including CLI-based or graphical tools), and it also provides an API that enables external programs to make similar requests. But the most fundamental aspects of a container engine’s functionality are performed by its core component, called the container runtime. The container runtime is responsible for creating the standardised platform on which applications can run, for running containers, and for handling containers’ storage needs on the local system. Some popular container engines include Docker Engine, CRI-O, and containerd”.4
VMs vs containers:
The critical difference between VMs and containers is that each VM has its kernel5, which it uses to virtualise the hardware (basically carving some of the host’s hardware resources and making it accessible to the other parts of the guest OS). Containers, on the other hand, share the host’s6 kernel, virtualising the host OS instead and sharing access to the hardware without entirely obscuring it from the host or limiting itself to the predefined hardware resources. This feature makes containers lightweight and significantly faster than VMs.
From the brief prior definitions and discussion, it might be evident that there is a time and place for VMs and containers. However, there is a preferred choice in our context, and we argue that containers are the best solutions to most7 HTA applications.
The development process involves quite a few iterations, and it is a significant advantage to have a lightweight environment to support and speed this process. On the other hand, the existing containers’ ecosystem makes it extremely easy to deploy containerised decision-analytic models, data collection/presentation web applications, or Application Programming Interfaces (API)s.
Moreover, in every iteration, VM users must install the host OS, upgrade it (if necessary), install dependencies, maintain its security, and then install their application or code.
Docker:
What is docker:
“Docker is an open-source software designed to facilitate and simplify application development. It is a set of platform-as-a-service products that create isolated virtualised environments for building, deploying, and testing applications”. It is software that allows OS-level virtualisation.
What is Docker Engine:
“Docker Engine acts as a client-server application with:
- A server with a long-running daemon process dockerd.
- APIs which specify interfaces that programs can use to talk to and instruct the Docker daemon.
- A command line interface (CLI) client docker.”
Docker engine is the software component that enables our computer’s OS to act as a container host.
What is a dockerfile:
While we can execute (in a terminal) a set of docker commands to assemble an image, it is more convenient to use a dockerfile. A dockerfile is a text file that commonly goes with the name “Dockerfile” and contains the instructions or commands that we would want docker to follow build a docker image.
What is a Docker Image?
A docker image consists of layers representing the dependencies, libraries, source code, and other files needed for one or more applications to run. The layers constituting a docker image are read-only (immutable or unchangeable) files that we occasionally refer to as snapshots. Consequently, any required changes in those layers entail rewriting or recreating the said image.
What is a Docker Registry?
A docker registry stores built images, so that others can use them.
What is a Docker Container?
We can not run docker images since they are unchangeable (the image layers are read-only). However, docker can add a writeable layer (also known as a container layer) on top of the image immutable layers to create a container. In other words, we can think of a container as an instantiated copy (a read-write copy) of an image. This container (writeable or read-write) layer allows editing a complete copy of the image (immutable layers).
Installing software:
Install Docker Engine:
Please ensure that the host machine packs the hardware supported by docker; otherwise, we will not be able to install and run docker as expected. Please check here for the hardware prerequisites. Moreover, docker requires one of two backends, the Subsystem for Linux (WSL)6 or the Hyper-V8. Therefore, either:
- install WSL 2 or
- enable the Hyper-V and Containers Windows features.
To install docker in Windows 10:
- Download the Docker Desktop for Windows form here. Users of other OSs should check here.
- Double click on the downloaded file, Docker Desktop Installer.exe, to run the installer.
- Depending on whether we want to use, or can only use, the WSL 2 backend, When prompted, ensure the “Use WSL 2 instead of Hyper-V” option is selected. “If your system only supports one of the two options, you will not be able to select which backend to use”.
- Follow the instructions on the installation wizard and complete the installation process.
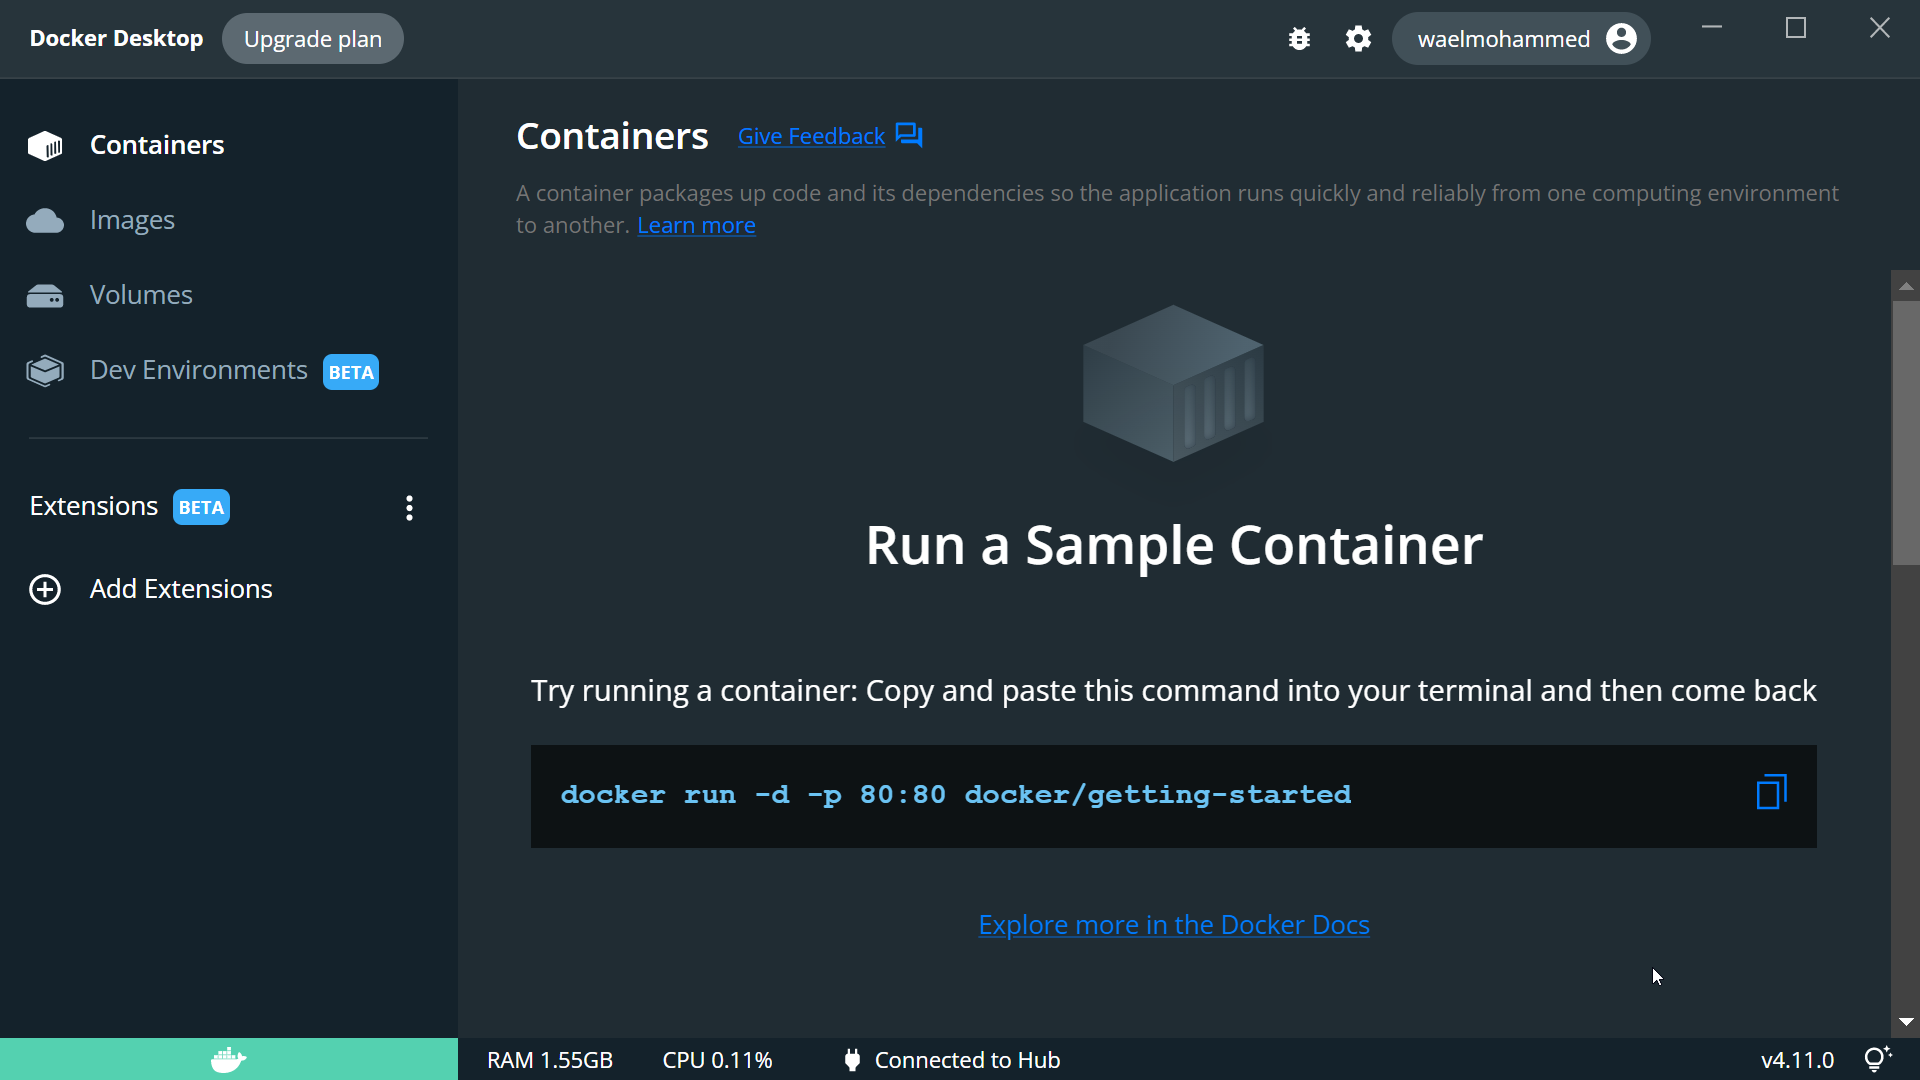
We will primarily interact with docker from Windows PowerShell, but let us open the Graphical User Interface (GUI) and log in using our Docker Hub account. To get a Docker Hub account, navigate here for a free account to facilitate sharing docker images.
 |
|---|
| Docker Desktop |
Visual Studio Code and docker extensions:
There are many Integrated Development Environments (IDE)s out there. Some are very good or specialise in specific languages (for example, we think RStudio is the best IDE for R). So it is likely that some of us already have one installed on our machines if we develop models or program data analysis scripts. However, we still recommend the installation of Visual Studio Code (VS Code) for its versatile capabilities, including the reason it is part of this tutorial, its docker extensions.
Once we install and run VS Code, we can navigate to the “Extensions” tab on the left-hand side panel (see screenshot below). The two extensions we want to install are developed by Microsoft (confirmed by a blue circle with a tick inside):
- “Docker”, and
- “Remote - Containers”
 |
|---|
| Docker extensions on Visual Studio Code |
We demonstrate the usefulness of these extensions in the following sections, but let us interact with docker from VS Code’s PowerShell terminal now. As we can see from the image below, calling a docker returned a valid response.
 |
|---|
| Running a docker command on Visual Studio Code |
Since we are yet to have a docker container in our system, the docker ps command returns nothing in the screenshot above. This is because the ps child in the docker ps command tells docker to list the running container. Moreover, if we added the option --all (docker ps --all) or the flag -a (docker ps -a), docker will list all containers, including ones that are not running.
Building, running and interacting with our first container:
1: Running our first docker container:
As we explained earlier, we use docker to build an image before we ask it to run an instance of that image in the form of a container. However, let us start with a simple example where we run an existing9 image. To put this example into perspective, we choose a python image since we do not have python in our system. This example illustrates one of the benefits containers bring to the development process. The tools, software or language we want to employ need not be installed (like the case with python in this example) or even compatible with the native OS we are running.
1
docker run --name first_python --rm -it python:3.7.13-alpine3.16
Now let us dissect the command above:
- the [OPTION] –name allows us to set the name of the instance of the image (the container) we are about to run. This name will consequently allow us to interact with (
start,stop,kill, orremove) said container. - the [OPTION] –rm automatically removes the container when it exits.
- the [OPTION]s -it combines two flags:
- the -i flag (or “–interactive” option) which, according to the docker documentation, “Keep STDIN open even if not attached”. Put simply, it enables the container to read inputs from our terminal/console and react or present resulting outputs.
- the -t flag (or “–tty” option), which allocates a pseudo-TTY (“tells Docker to allocate a virtual terminal session within the container”).
- the
**IMAGE**: the name, or name:tag, of the image from which we want docker to instantiate a container. In this example, the image is “python” with the tag “3.7.13-alpine3.16”. We use this version of the officialpythonimages, hosted on docker hub because it is small.
We can get the same results if we run the above command in any of the following configurations:
1
2
3
docker run --name first_python -it --rm python:3.7.13-alpine3.16
docker run --name first_python -t -i --rm python:3.7.13-alpine3.16
docker run --name first_python -i -t --rm python:3.7.13-alpine3.16
Docker expects the run subcommand to follow the docker run [OPTIONS] IMAGE [COMMAND] [ARG...] format. For more information on what [options] are supported, please see docker run documentation
 |
|---|
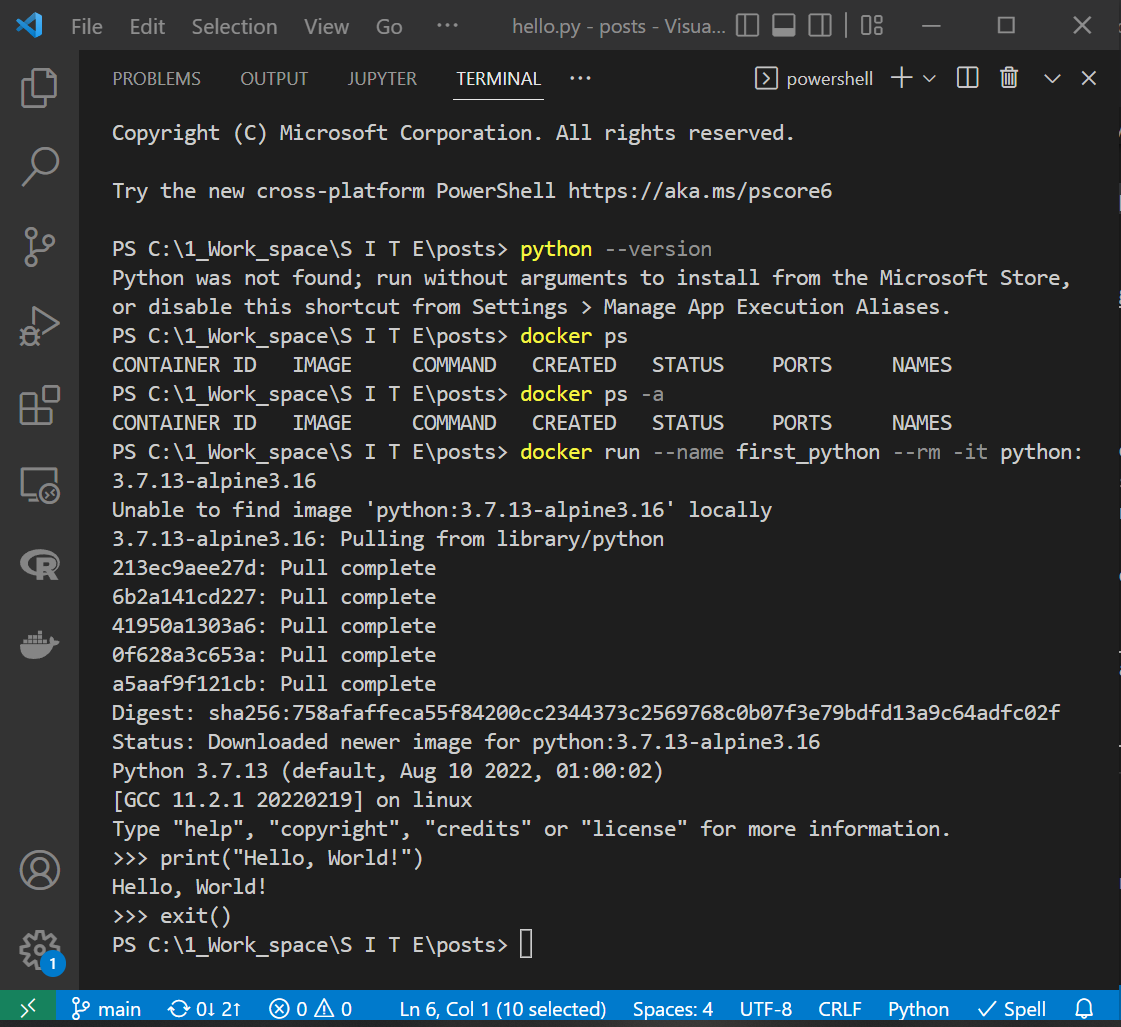
Running the official python image (python:3.7.13-alpine3.16) |
In line with what we did with the run child command, let us explain the screenshot above. We called
python --versionto confirm thatpythonis unavailable locally,docker psfor docker to report any running process (containers) anddocker ps --allto report all containers (including those that are not running),docker run, which we explained earlier,print()function for python to echo the message “Hello, World”, andexit()function to quit the python session and the entire container.
We can see that docker, in the image above, did not find the image (python:3.7.13-alpine3.16) in our system, so it pulled a few files (likely the image layers) from its servers (see below the ” 3.7.13-alpine3.16: Pulling from library/python “ line in the screenshot). Once it finished downloading the image, docker started the “first_python” container.
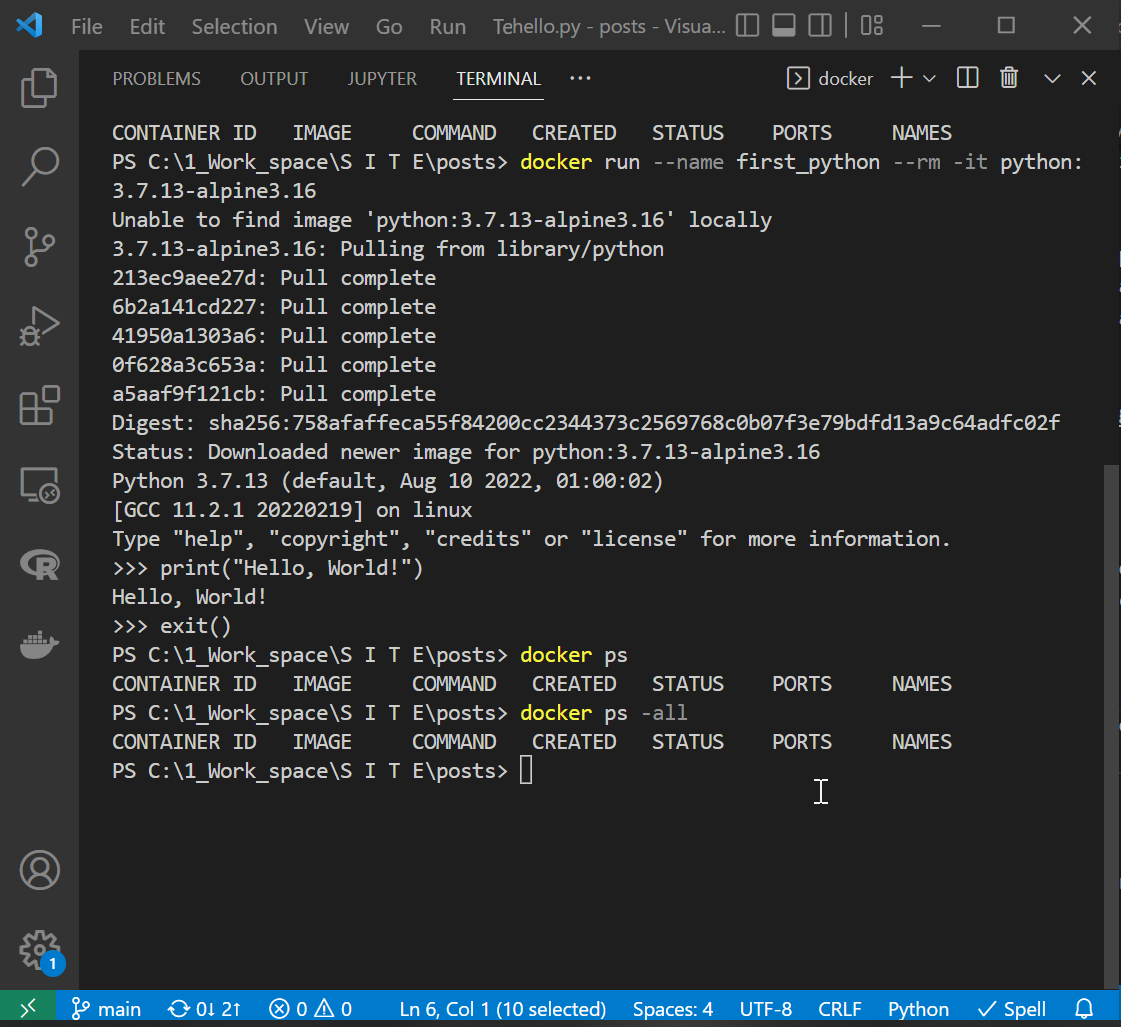
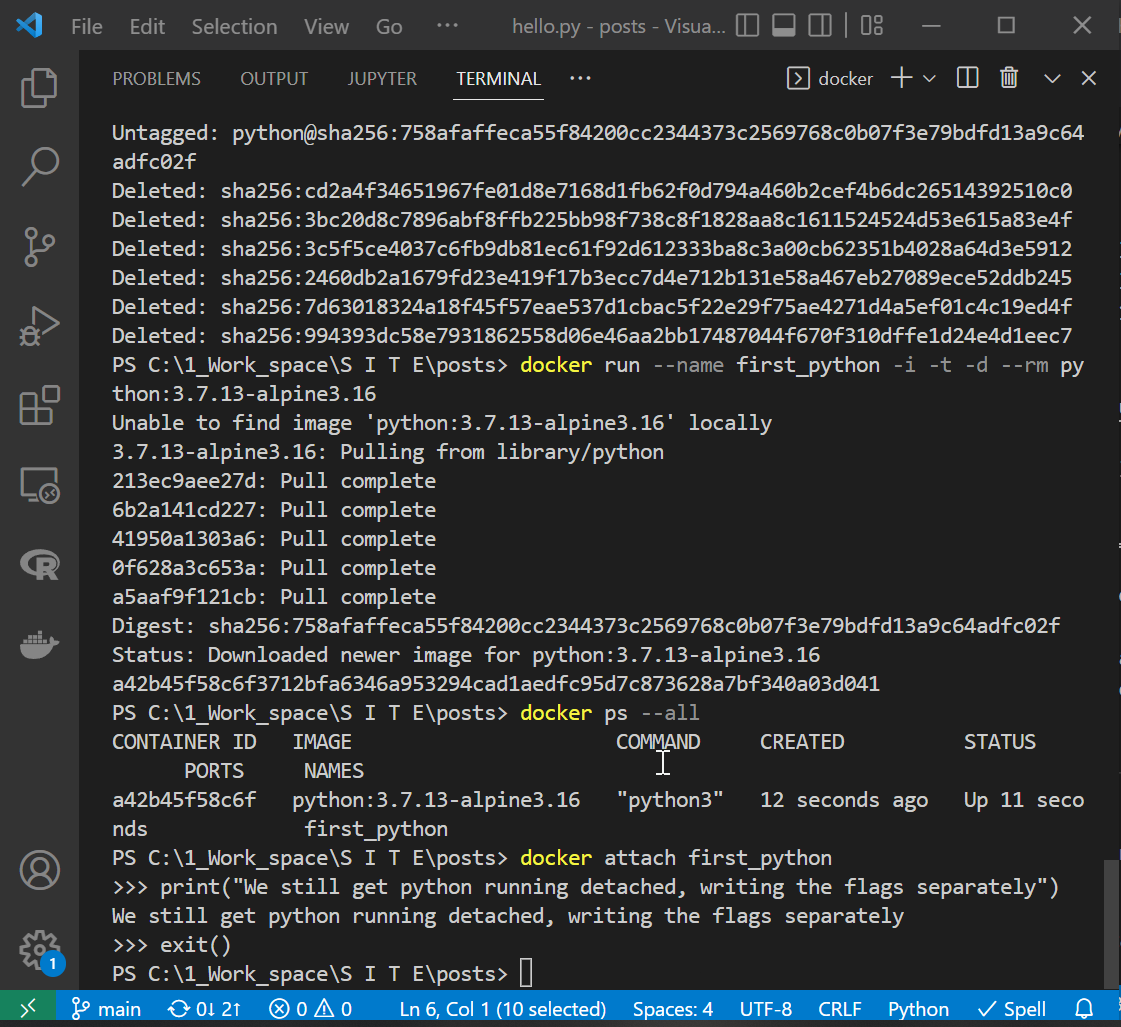
Remember that the --rm flag in the docker run command cleans after or removes the “first_python” container. Therefore, if we call docker ps or docker ps --all, docker will not list the “first_python” container. We demonstrate this in the screenshot below.
 |
|---|
| Checking if the “first_python” container still exists |
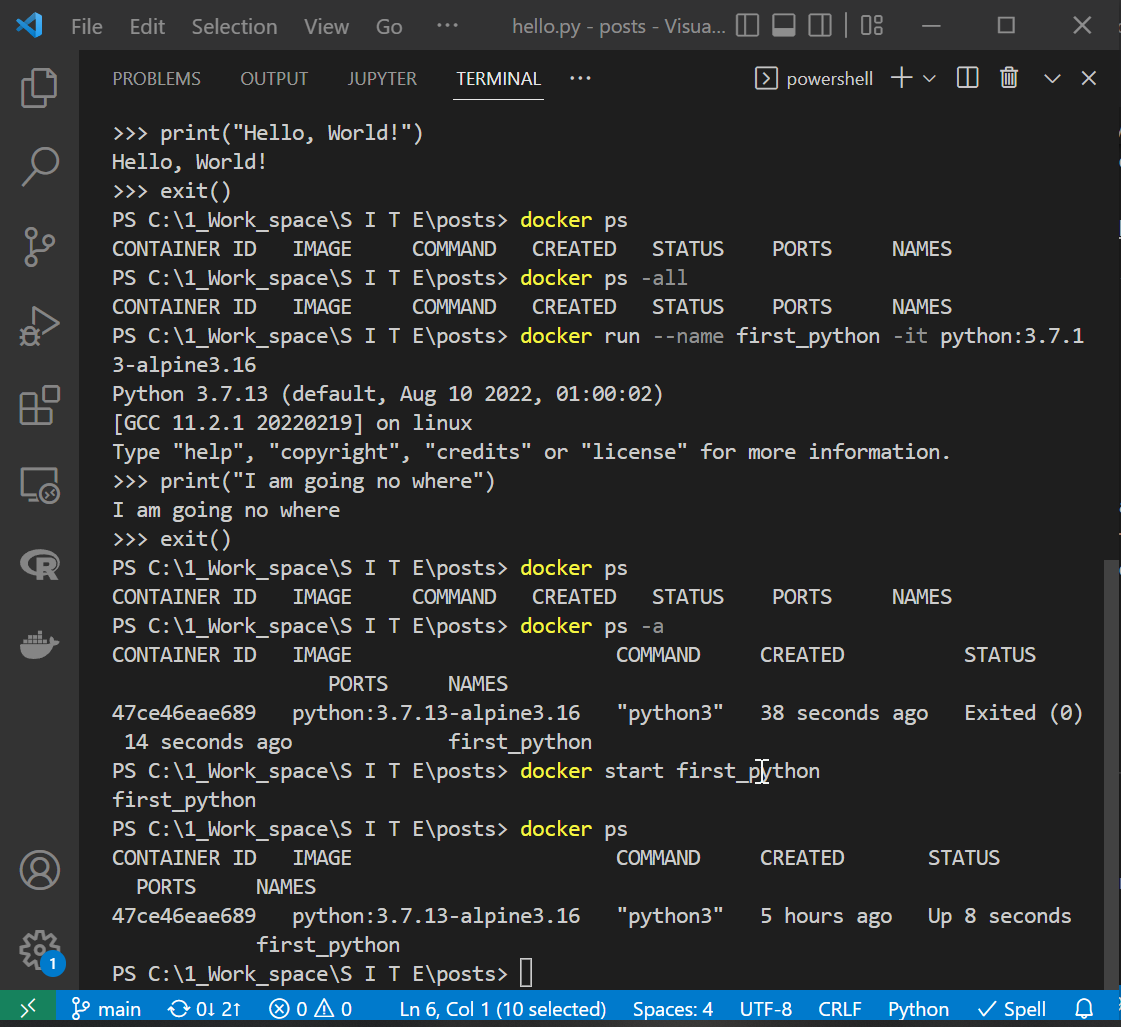
It is not always the case that we want to remove the container once it exits. Therefore, it makes sense to call docker run without the --rm option. We show the effects of removing --rm in the following image.
 |
|---|
Running the “first_python” container without the --rm flag |
Notice that running a container from this python image is fast. The reduction in running time is because docker did not download any files this time as it already has the image locally. Later, we will learn how to remove containers and images from our machine. We will also re-download this same python image to show docker pulling the image layers again, confirming the relevant deletion commands took effect.
2: docker run vs docker start:
Now that docker did not remove the “first_python” container, we can start it using the docker start command. The run subcommand differs from start in that the former creates the container layer on top of the immutable image and starts it, whereas the latter only starts one or more stopped containers. The format of the start child command is docker start [OPTIONS] CONTAINER [CONTAINER...].
1
docker start first_python
 |
|---|
| Starting the “first_python” container |
In the image above, docker started the “first_python” container but did not jump into the container’s python console or shell terminal. Calling the start subcommand without any flags or options starts the container in a detached manner. Detaching the container (or running it in the background) allows us to use the terminal window (to save code changes to version control, for example) without exiting the container. Utilising the detach mode might not seem important in the current scenario, but we will see its usefulness in coming posts. Before we discuss how to get into the container to interact with it, let us stop it.
3: docker stop:
Below we illustrate stopping the “first_python” container using the stop child command. We can see below that the python container was successfully stopped but not removed. The format of the stop child command is docker stop [OPTIONS] CONTAINER [CONTAINER...].
 |
|---|
| Stopping the “first_python” container |
Great, we managed to start and stop the “first_python” container, but how do we make use of the container once it started in a detached mode? The answer is: to use the attach subcommand.
4: docker attach:
As we demonstrate below, we can use the attach child command to jump into the running “first_python” container. The format of the attach child command is docker attach [OPTIONS] CONTAINER.
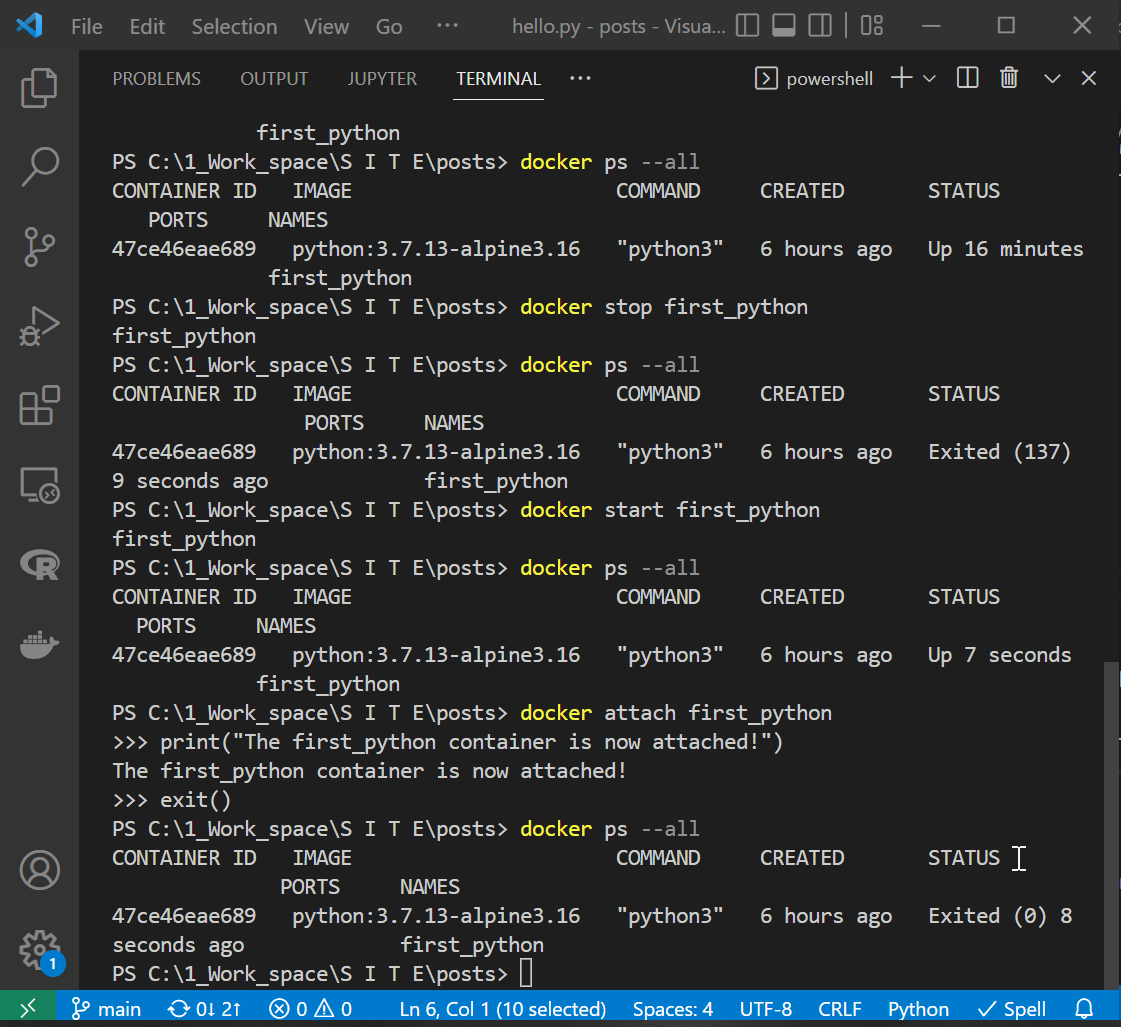 |
|---|
| Starting then attaching the “first_python” container |
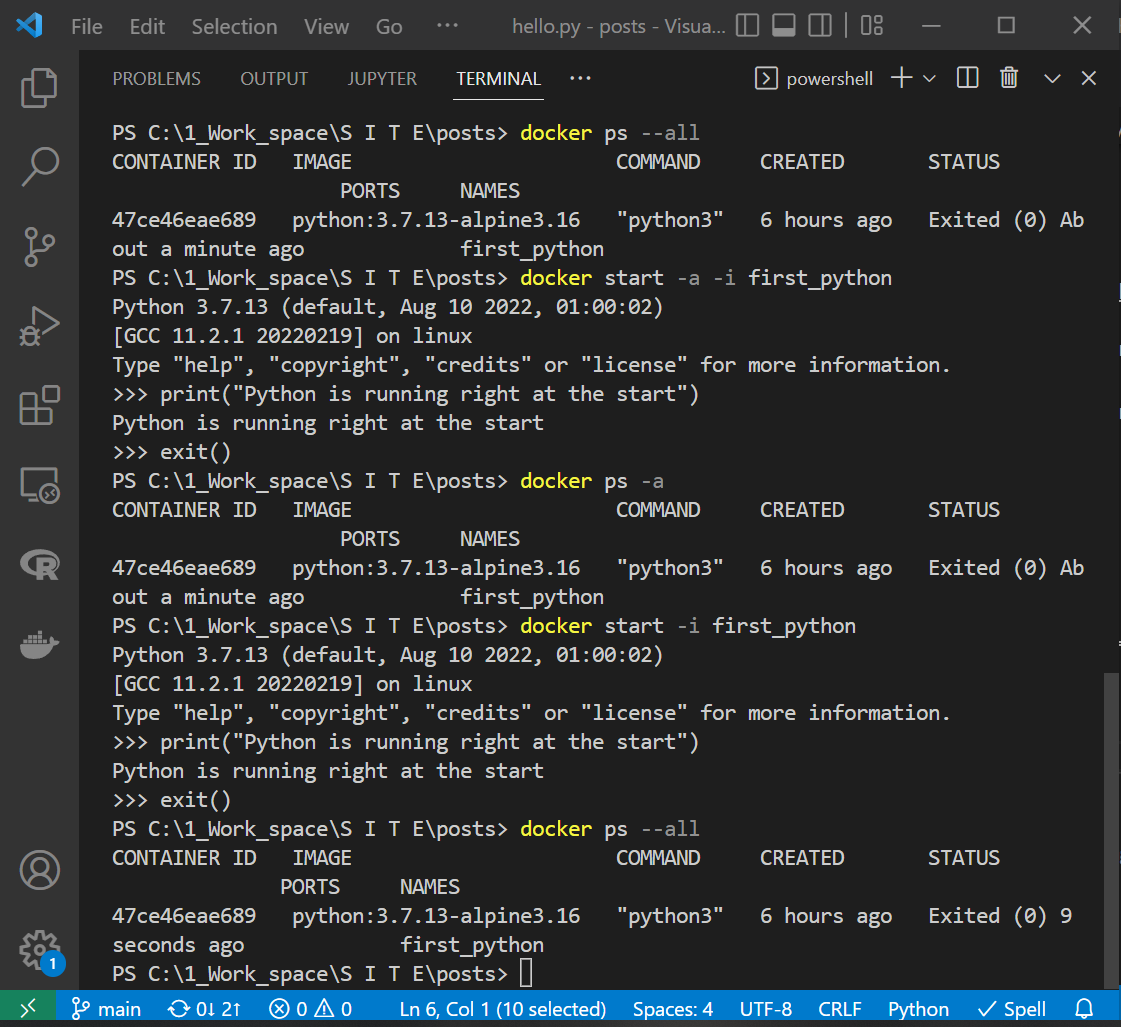
However, this is not the only way to attach the “first_python” container. We can access the container using the -a or --attach and the -i or --interactive flags with the start subcommand.
1
docker start --attach --interactive first_python
 |
|---|
| Starting the “first_python” container in attached mode |
We might get by if we omitted the -a flag. However, we would have access to the container’s standard input, not the standard output and error. On the other hand, calling the same command with -a but missing the -i flag (which attaches the container’s STDIN or inputs) will open the container, and we will see >>> from python’s console. However, we will not be able to interact with it (no keyboard inputs will get through to the container). On such occasions, we need to press both “CTRL” and “C” to exit the container (This shortcut works on Windows OS).
5: Running a new container using the name of an existing one:
Docker will complain if we call the run subcommand with a name (using the --name option) of an existing container, as we see in the screenshot below.
 |
|---|
| Error running a new “first_python” container |
We need to use the rm child command to remove the existing container.
6: docker rm and docker rmi:
Let us remove the “first_python” container and the python:3.7.13-alpine3.16 image by calling the rm, and the rmi child commands, respectively. docker rm requires the container or containers not to be running for docker to remove them successfully. We look at these commands in the screenshot below. The format of the rm child command is docker rm [OPTIONS] CONTAINER [CONTAINER...]; whereas, the rmi subcommand format is docker rmi [OPTIONS] IMAGE [IMAGE...].
1
2
3
4
# Remove the "first_python" container:
docker rm first_python
# Remove the "python:3.7.13-alpine3.16" image:
docker rmi python:3.7.13-alpine3.16
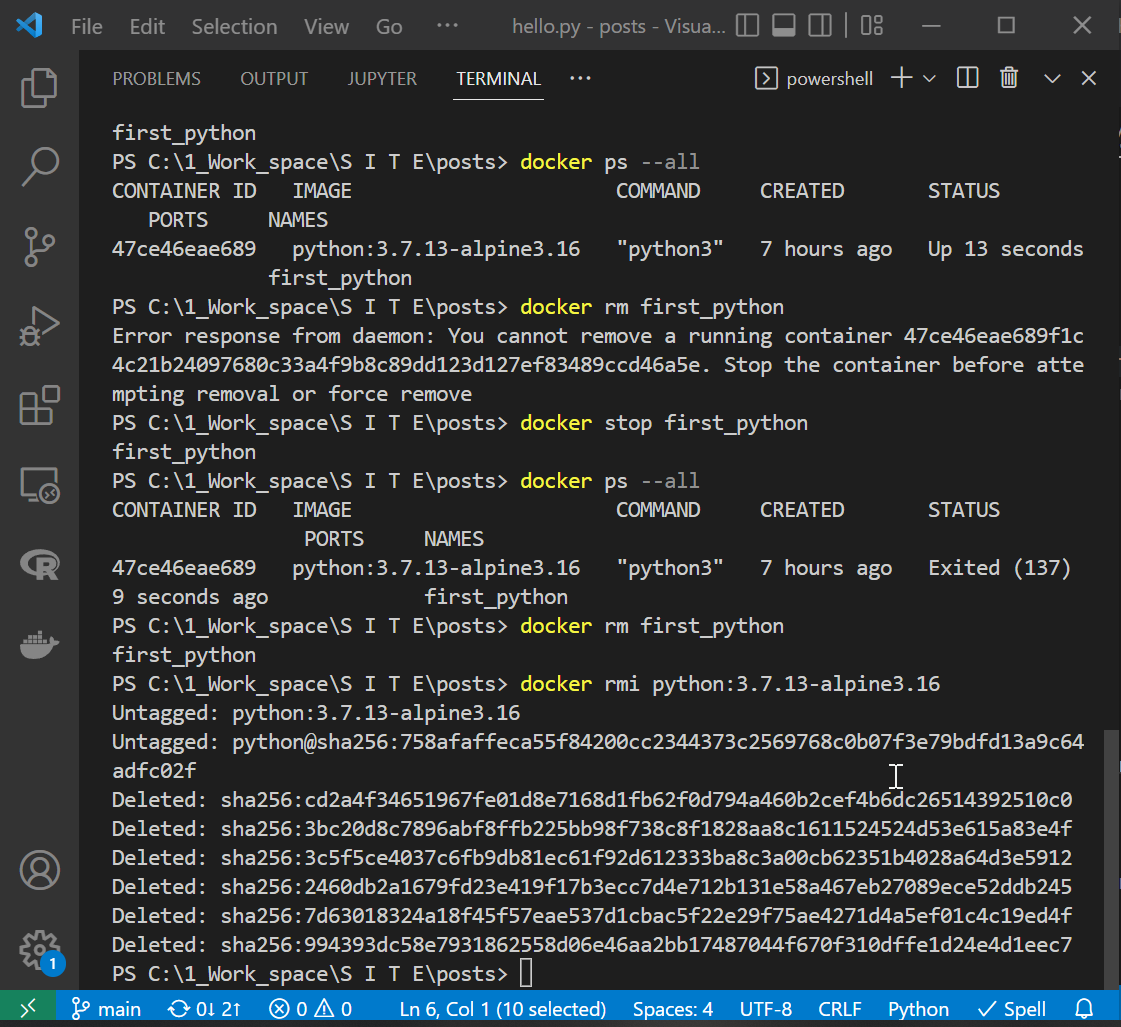 |
|---|
Deleting the “first_python” container and the python:3.7.13-alpine3.16 image |
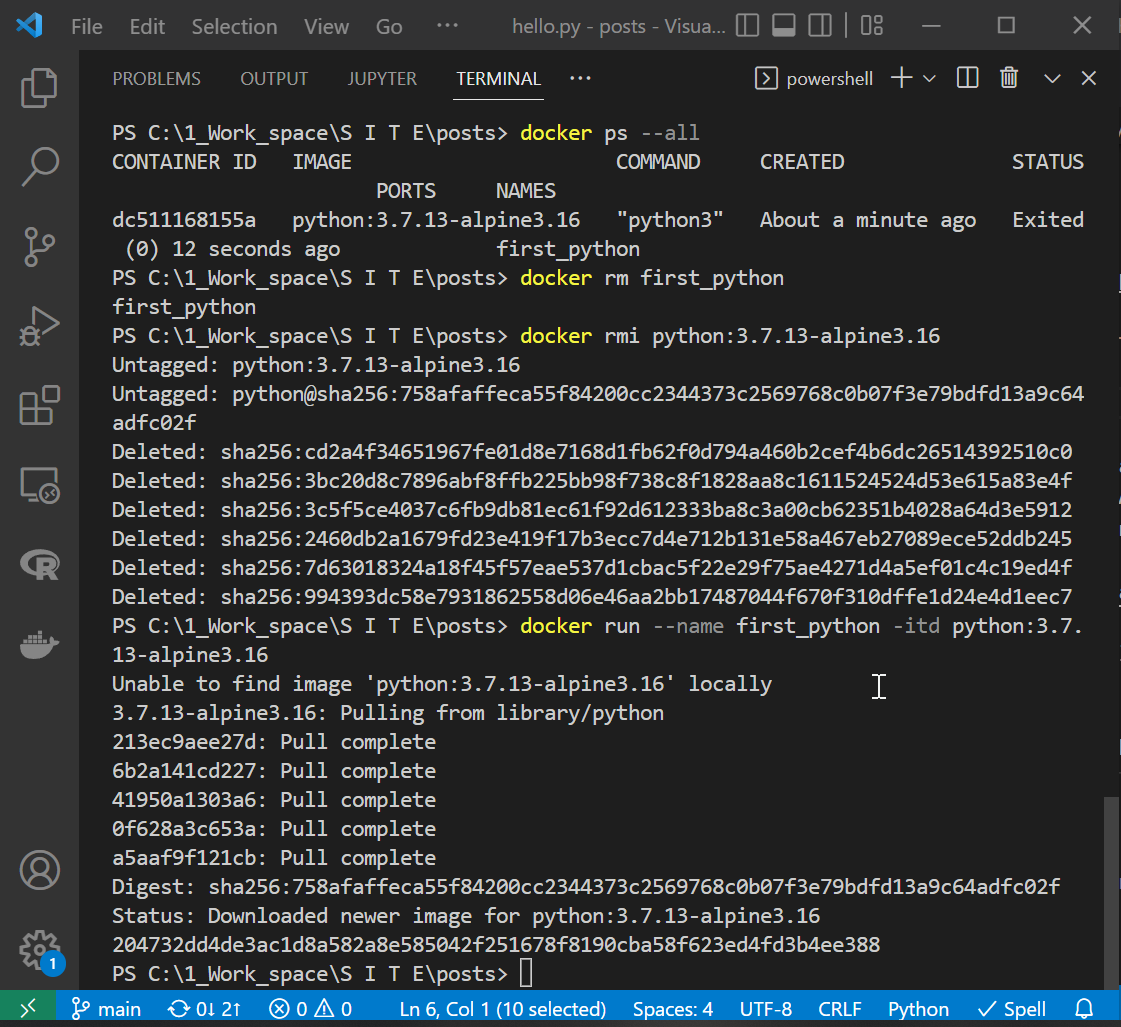
7: docker run in detached mode:
We highlighted earlier that occasionally starting or running containers in detached mode might be helpful. So, in addition to docker start, we can get our python container running detached by calling the run subcommand with the -d flag or --detach option.
1
docker run --name first_python --rm -itd python:3.7.13-alpine3.16
 |
|---|
Calling docker run to download the python:3.7.13-alpine3.16 image again |
Writing the docker run flags separately and in a different order still works fine.
1
docker run --name first_python -i -t -d --rm python:3.7.13-alpine3.16
 |
|---|
| Calling docker run in a slightly different configuration |
Since we removed the python:3.7.13-alpine3.16 image, calling the run child command takes time for docker to re-download the image layers. The screenshot above shows how docker did not find the image locally but commenced with downloading it.
8: Mounting storage into a container:
8.1: Running a python script:
Docker containers can access user-defined paths in the host’s (our machine’s) physical storage. In the code chunk below, we run the same python container we have been running so far, but we use:
- the flag -v to mount the current working directory (the one from which we initiated the terminal) onto the container,
- the variable
${PWD}to indicate to or tell docker to grab the path of the current working directory, - the statement
${PWD}:/srcto tell docker to mount the host’s current working directory${PWD}onto the container’s/srcfolder, and - the executable or [COMMAND]
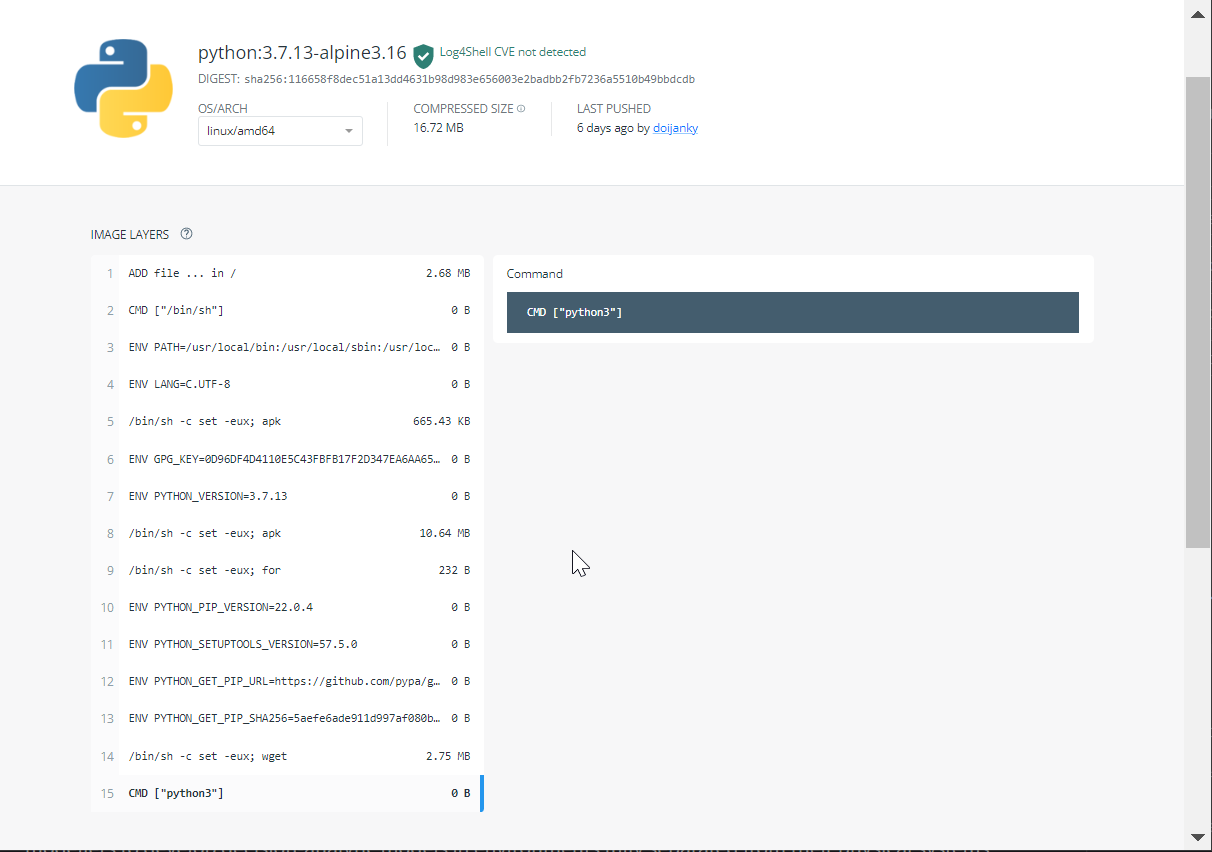
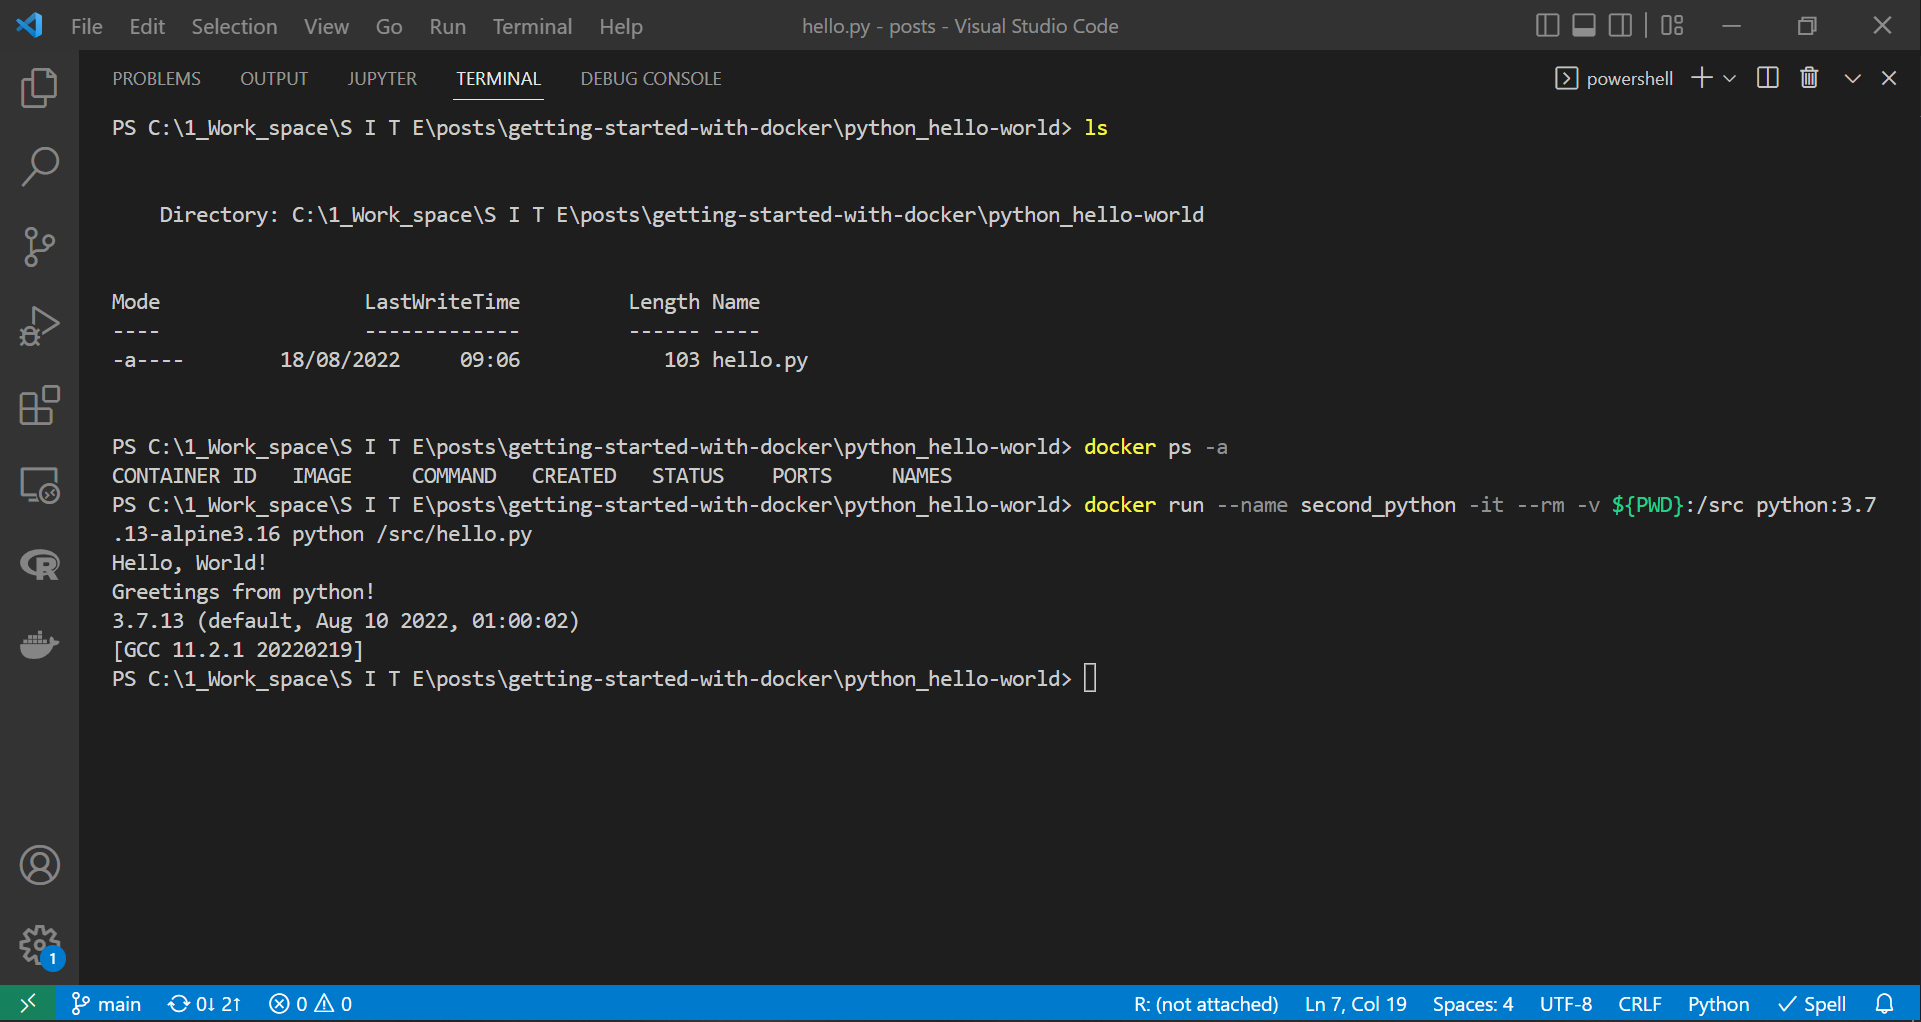
pythonfollowed by the [ARG …] or argument “/src/hello.py” to invokepythonto process the supplied script. Adding[COMMAND] [ARG...]to the end of thedocker runcommand overrides the image’s nativeCMDcommand (CMD ["python3"]for thepython:3.7.13-alpine3.16image). We can navigate to the official image page on Docker Hub to see the instructions it uses to build the official image (in this example, we can go to: https://hub.docker.com/layers/python/library/python/3.7.13-alpine3.16/images/sha256-116658f8dec51a13dd4631b98d983e656003e2badbb2fb7236a5510b49bbdcdb?context=explore).![python_official]()
1
docker run --name second_python -it --rm -v ${PWD}:/src python:3.7.13-alpine3.16 python /src/hello.py
Docker would create any of the directories declared in the statement that follows the -v flag (${PWD}:/src in our python example) if they did not exist.
 |
|---|
Mounting a volume and running the hello.py python script |
Notice in the picture above how the container is created and starts running before it processes the hello.py file. The results of processing the script are the “Hello, World!” message followed by the version of python installed in the container.
We print the hello.py file contents below for the reader’s reference.
1
2
3
4
5
6
7
# hello.py

print("Hello, World!")
print("Greetings from python!")

import sys
print(sys.version)
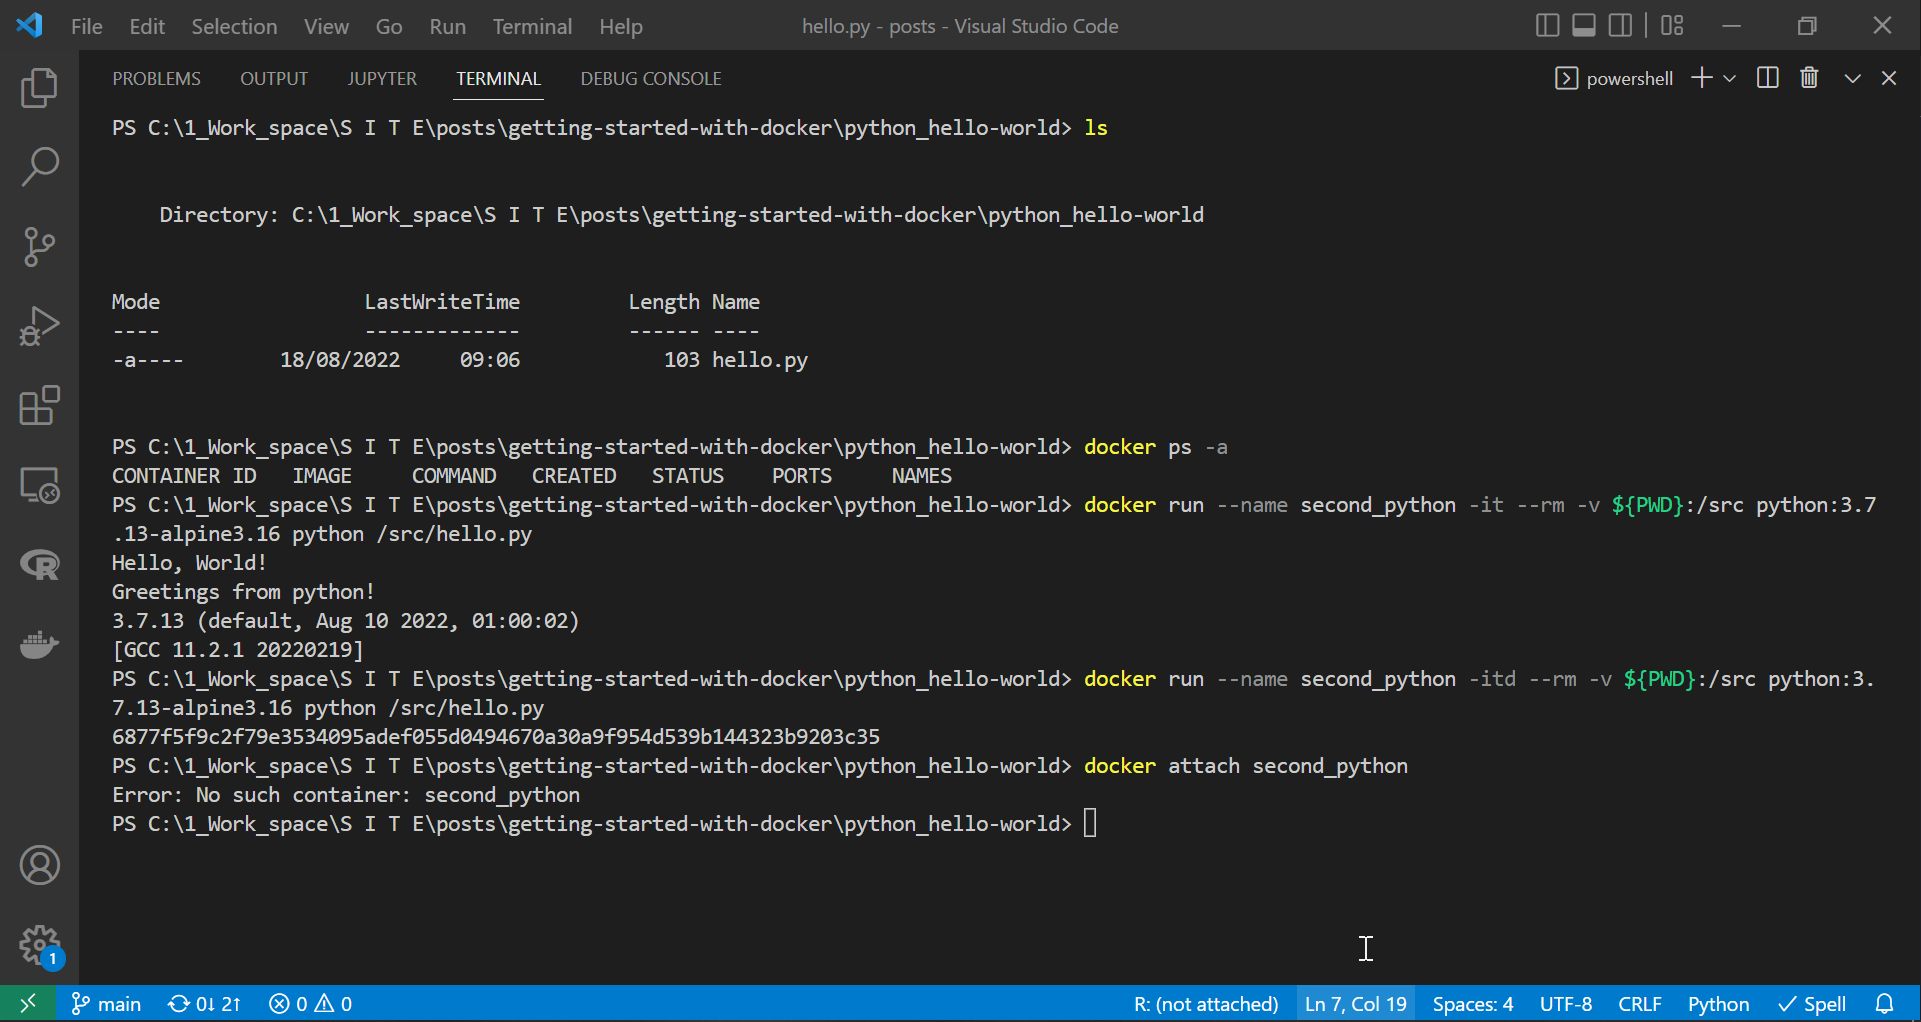
If we run the container above on detached mode (adding the -d flag to the run subcommand), it will execute the python script and exit, but we will miss the results of that process since it will take place in the background.
1
docker run --name second_python -itd --rm -v ${PWD}:/src python:3.7.13-alpine3.16 python /src/hello.py
We demonstrate this behaviour in the following image.
 |
|---|
Mounting a volume and running the hello.py python script on detached mode |
Please note that we called the above commands from Windows PowerShell (Command Prompt does not support the ${PWD} variable).
8.2: Editing and running a python script:
In the previous section, we saw how we overrode the native container’s start-up command or CMD. However, we still called a command similar to the one we replaced. This section demonstrates how the sh or shell command gives us access to the container terminal. Moreover, with the sh CMD, the container will not quit unless we exit the shell from within the container or use docker stop from the host’s terminal.
The mounted working directory (located in the host’s physical storage, referred to by ${PWD} and at which the terminal window is active) becomes accessible from both the container and the host. To demonstrate this, we run a few Linux commands to create a file and save some data from within the container. This operation confirms that the changes made by software running inside the container to files located in the mounted storage persist in the host’s storage. This feature shows one strength containers bring to the development process. So, below we:
- add sh to the end of the previous command to run the container’s shell.
1
docker run --name second_python -it --rm -v ${PWD}:/src python:3.7.13-alpine3.16 sh
 |
|---|
| Mounting a volume and accessing the terminal on attached mode |
In the three code chunks below, we list and explain the commands we called in the gif above.
1) We run the first set of commands in the host’s terminal.
1
2
3
4
5
6
7
# On the host's terminal:
## Get the current working directory:
$(PWD)
## List the content of the current directory:
ls
## Run the "second_python" container on detached mode using the `-d' flag:
docker run --name second_python -it --rm -v ${PWD}:/src python:3.7.13-alpine3.16 sh
2) We then call the next set of commands from the container’s shell.
1
2
3
4
5
6
7
8
9
10
11
12
13
14
15
16
17
18
19
20
21
22
23
24
25
26
27
# On the container's shell:
## List the content of the container's root directory:
ls
## Change the directory to the "src" folder to process the `python` script and create a "txt" file:
cd src
## List the content of the "src" folder showing its contents:
ls
## Tell python to run the "hello.py" script printing the outputs in the terminal:
python hello.py
## List the content of the "src" folder showing no change in its contents:
ls
## Print the outputs of the "ls -l" command into the "directory.txt" file creating it:
ls -l > directory.txt
## List the content of the "src" folder to confirm the creation of the "directory.txt" file:
ls
## Print the content of the "directory.txt" to the terminal to see its contents:
cat directory.txt
## Move back to the root directory to add more contents to the "directory.txt" file:
cd ..
## List the contents to show that we are in the root directory:
ls
## Print the outputs of the "ls -l" command to the end">>" of the "directory.txt" file inside the src folder:
ls -l >> src/directory.txt
## Print the content of the "directory.txt" to the terminal showing the new contents:
cat src/directory.txt
## Exit the container's shell, which exits the entire container:
exit
3) Finally, when the container exits (following the exit command in the container’s shell), we run the last set of commands below.
1
2
3
4
5
# Back to the host's terminal:
## List the contents of the working directory to confirm the "directory.txt" file persists after closing the container:
ls
# Print the contents of the "directory.txt" to the host's terminal, proving that we can successfully interact with it:
cat .\directory.txt
Since we are using the sh COMMAND, overriding the image’s native [CMD] command, we can run the container above in a detached mode. Notice how we use the attach subcommand to gain access and delete the “directory.txt” file we created above using the rm command in Linux.
1
2
3
4
# Run the "second_python" container on detached mode:
docker run --name second_python -itd --rm -v ${PWD}:/src python:3.7.13-alpine3.16 sh
# Attach the "second_python" container:
docker attach second_python
 |
|---|
| Mounting a volume and accessing the terminal on detached mode |
If the container has a text editor, we can run it to edit files. For example, the “second_python” container, or perhaps the image we initiated it from, comes with the vi text editor. Below we demonstrate editing the contents of the hello.py script and how changes instantly appear on the file while running from the host.
 |
|---|
| Mounting a volume, accessing the terminal on detached mode and editing a file |
Let us discuss a couple of points regarding how we edited the hello.py script using the vi text editor (as we can see in the gif above). Interested readers can learn more about vi here.
- We called
vi hello.pyfrom the container’s shell to start editing the “hello.py” file located in the mounted directory. - We navigated to the lines we wanted to remove and pressed
d+d(the letterdtwice) on the keyboard to delete them. - We saved and closed the
hello.pyfile by inputting:wqbefore pressingENTER.
9: docker build and Dockerfile:
Before we can use the build subcommand, we need to save the instructions we want docker to follow in a dockerfile (see here to learn more about the best practices in writing a dockerfile).
9.1: Writing the Dockerfile:
As we mentioned earlier, a dockerfile consists of a set of instructions, and in the following example, we use:
- FROM: sets the Base Image for subsequent instructions. A valid dockerfile must start with a FROM instruction, and the base layer can be any valid image. It is common for this image to be from public repositories, including Docker Hub.
- COPY: copies files or directories from the host to the image. This instruction expects the following format
**COPY** <src(HOST)> <dst(IMAGE)>. - WORKDIR: sets the working directory for any RUN, CMD, ENTRYPOINT, COPY and ADD instructions that follow it in the dockerfile. If the WORKDIR does not exist, docker will create it. This instruction can be used multiple times in a Dockerfile. If we provide a relative path, it will be relative to the path of the previous WORKDIR instruction.
- CMD: provide defaults for an executing container. These defaults can include an executable, or they can omit the executable, in which case we must also specify an ENTRYPOINT instruction. The CMD instruction has three forms:
- CMD
["executable", "param1", "param2"](exec form, this is the preferred form) - CMD
["param1", "param2"](as default parameters to ENTRYPOINT) - CMD
command param1 param2(shell form) In the following dockerfile, we use the third (shell) form.
- CMD
1
2
3
4
5
6
7
8
9
10
# Dockerfile

# Declare the base layer:
FROM python:3.7.13-alpine3.16
# Copy files from the host's current directory to the container's "/src" folder:
COPY ./getting-started-with-docker/python_hello-world/ /src
# Set the container's "/src" folder as its working directory:
WORKDIR /src
# Set the command the container calls when we run it:
CMD python hello.py
Below we script the dockerfile slightly differently but still get the same results.
1
2
3
4
5
6
7
8
# Declare the base layer:
FROM python:3.7.13-alpine3.16
# Set the container's "/src" folder as its working directory:
WORKDIR /src
# Copy files from the host's current directory to the container's "/src" folder:
COPY ./getting-started-with-docker/python_hello-world/ .
# Set the command the container calls when we run it:
CMD python hello.py
In the above version of the Dockerfile, unlike the former one, we have put the WORKDIR instruction before the COPY one. This change allowed us to replace “/src” in the COPY instruction with a dot “.” as a shortcut to tell docker to copy files to the container’s working directory (“/src”).
9.2: Building a docker image using the DockerFile:
The options (or flags) of the docker build command (or the build child command to be specific) we use below are:
- –tag: which allows us to name, and optionally tag, the image in the “name:tag” format (for example: –tag first_python_image:latest),
- –file: which allows us to point docker to the “relative path” of the dockerfile that we want it to use to build the image (./getting-started-with-docker/python_hello-world/Dockerfile in this example), and
- . (the dot): This lets docker know that the “path” of the files we want to use is the local folder from where we execute the command. This dot differs from the one in the dockerfile instructions in terms of its context; in the build command, docker expects a path in the host’s storage.
1
docker build --tag first_python_image:latest --file ./getting-started-with-docker/python_hello-world/Dockerfile .
Please note that we can replace the –tag option with the flag -t; however, we recommend using –tag to help avoid the confusion that it may lead to with the -t flag in the run subcommand.
 |
|---|
| Building a docker image from a dockerfile |
9.3: Run the a container from the “first_python_image”:
Running the dockerfile-based image we built is no different from running an official one. Moreover, as we discussed a few times earlier, we will not see the outputs of python processing of the hello.py file if we run the container in detached mode. Therefore, we need to call docker run without the --detach option (or -d flag). Below we demonstrate both cases.
1
2
3
4
5
6
7
8
9
10
11
# Running on detached mode:
## Run the container:
docker run -itd --rm --name third_python first_python_image
## Check if it is still running:
docker ps --all
## Try to attach it anyway:
docker attach third_python

# Running on attached mode:
## Run the container:
docker run -it --rm --name third_python first_python_image
 |
|---|
| Running a docker container from the dockerfile-based image (detached) |
Copying the python script into the container means that any changes we make to the host’s or container’s copy will not appear in the second one, as we saw earlier in mounting the host’s working directory. However, this feature comes in handy when using containers for deployment purposes where we have the product and its dependencies in one place, ready to ship. We will discuss the use of docker to deploy products in some of the following tutorials.
 |
|---|
| Running a docker container from the dockerfile-based image (attached) |
To emphasise, we handle local dockerfile-based containers the same way we handle official ones.
More examples:
This tutorial has already gone far enough in terms of contents and complexity. However, one example, or python, may not have satisfied our curiosity. Therefore, we will feature the use of docker in a few posts or tutorials. Stay tuned!
A quick note about VS Code extensions for docker:
One of the good reasons to install the “Remote - Containers” extension is that it makes using a docker container as a development environment so easy. Please see here to learn more on how to utilise its features.
Conclusion:
In this post, we covered a bit of knowledge surrounding containerised applications and a set of skills required to get started with docker-powered applications. While we only used one programming language, python, as an example, we aim to follow this tutorial with another that showcases several containerised software. Until then, the references below are the sources of the post contents and a venue for more information.
Sources:
- Containers vs VMs
- Virtualbox VMs
- What Are Containerized Applications?
- What is docker
- Getting started with docker
- Windows Subsystem for Linux
- Hyper-V windows feature
- Docker fundamentals and practice
- Dockerfile reference
- Docker Engine overview
- Docker Image vs Container: The Major Differences
- vi text editor
- Best practices for writing Dockerfile
“Shiny is an R package that makes it easy to build interactive web apps straight from R..”
Assuming that we correctly installed the software required to run the VM in the host. ↩
https://www.atlassian.com/microservices/cloud-computing/containers-vs-vms ↩ ↩2
https://www.datadoghq.com/knowledge-center/containerized-applications/ ↩
A kernel is the primary layer between the OS and the hardware that provides essential services to other parts of the OS. ↩
Docker, a container engine, requires the Windows Subsystem for Linux (WSL) to be installed in Windows. WSL2 uses a Linux kernel which allows docker to run Linux-based containers. ↩ ↩2
There is at least one situation or application where we did not employ containers; hence we refrain from assuming that they would work in all HTA applications (until we have had the chance to do some experiments). Those interested, stay tuned (or search in the blog now) for a tutorial on using docker to develop and run an ABM using a RepastHPC. ↩
Hyper-V allows users to create virtual machines on Windows 10. ↩
There are several official and unofficial (docker community contributions) images shared on Docker Hub; for example, official python images can be found here. ↩