
Introduction:
As we have mentioned in a previous post and in Smith et al. (2022)1, Application Programming Interfaces (API)s provide several benefits including security (allowing controlled access to sensitive data, code, or tools). APIs need to be deployed to allow users access to its endpoints. Containers and Virtual Machines (VM)s, on the other hand, play an important role in allowing developers to easily create, collaborate and deploy tools, including APIs.
In this post, we will:
- discuss the relevance to HTA,
- discuss the API we will deploy,
- deploy the API using a docker container, and
- interact with the locally deployed API.
Relevance, prerequisites and difficulty:
Relevance:
We have already discussed the relevance of APIs and containerised applications in previous posts. If you are new to one or both topics, we recommend you catch up before continuing this post. It is also worth it if it has been a while and you want to brush up on your skills.
Difficulty:
While we have tried to bring down the technicality in this post, it is fair to rate this post as “intermediate” on the difficulty scale. The main reason behind this classification is that this post requires a good level of understanding of both APIs and containerised applications.
Prerequisites:
First, unless you have a good grasp on the following topics, we recommend that you review:
- the APIs post, and
- the containerised applications post.
Second, we expect you to have the following software installed on your machine:
You can also find the two files containing the entire code discussed in this tutorial in the “deploying-plumber-powered-APIs-with-docker” folder on my GitHub repository.
The API:
Since the focus of this post is on the deployment process, we will try to keep this simple and re-use our simple API from the “Getting started with plumber post. Below is a copy of the code, which is also available in the “deploying-plumber-powered-APIs-with-docker” folder on my GitHub repository.
1
2
3
4
5
6
7
8
9
10
11
12
13
14
15
16
17
18
19
20
21
22
23
24
25
26
27
28
29
30
31
32
33
34
35
36
37
38
39
40
41
42
43
44
45
# plumber.R

# Below are the API methods and their corresponding functions,
# whereas the API title and description are at the end of the file.

# Load the package to help run the API:
library(plumber)

#* Welcome user.
#* The API says "Hi".
#* @param userName The user's name
#* @get /echo
function(userName="") {
  list(msg = paste0("Welcome to your first API, '", userName, "'"))
}

#* Draw a scatter plot.
#* This function will generate a scatter plot from 1000 randomly
#* sampled pairs of values.
#* @serializer png
#* @get /plot
function() {
  Random_1 <- rnorm(1000)
  Random_2 <- rnorm(1000)
  plot(Random_1, Random_2)
}

#* Multiply numbers.
#* Return the multiplication of two numbers.
#* @param a The first number
#* @param b The second number
#* @post /multiply
function(a, b) {
  as.numeric(a) * as.numeric(b)
}

#* @apiTitle Getting started with plumber
#*
#* @apiDescription Welcome to this demo API which was built to introduce
#* first time plumber-powered API developers to the process. The idea behind
#* these few lines are to populate Swagger auto-generated documentation which
#* can be later accessed by the sub-domain (_docs_/) or (\_docs\_/) in case
#* you do not see the underscore before and after the term "docs".
#* For example (http://127.0.0.1:0000/\_docs\_/).
#*
Deploying the API using a docker container:
Perhaps we need to be clear about the term “deploy”. Since containerised applications are, by definition, isolated from the host computer, running our API on a container is the first step in the deployment process, followed by pushing the image containing the application to a container orchestration system3, such as Google Cloud (GC) and Amazon Web Services (AWS). Therefore, while it is only the first step in the process, we still use the term “deploy”.
For simple docker commands, please review the “Getting started with Docker”. In addition to inking the previously introduced commands, we will introduce new ones and use a dockerfile to build the image that will host our simple API.
Writing a dockerfile:
A dockerfile is a file that contains or scripts the recipe that the docker engine will use to build our image. In this dockerfile we:
- declared “plumber’s” official image as the base layer using the “FROM” command,
- asked docker to set, or create then set, the folder “/api” as the working directory using the “WORKDIR” command,
- copied the files from the “/deploying-plumber-powered-APIs-with-docker/API_files/” folder to the “/api” directory inside the image using the COPY command, and
- sourced the “plumber.R” file, inside the “/api” folder using the CMD command. Note that there can not be more than one CMD command for any docker container.
1
2
3
4
5
6
7
8
9
10
# Dockerfile

# Get the docker image provided by plumber developers:
FROM rstudio/plumber
# Create a working directory in the container:
WORKDIR /api
# Copy API files to the created working directory in the container:
COPY ./deploying-plumber-powered-APIs-with-docker/API_files/ /api
# Specify the commands to run once the container runs:
CMD ["/api/plumber.R"]
Since we already declared “/api” as the container’s working directory using the “WORKDIR” command, we could replace “/api” with a dot “.” in the “COPY” command to get the same result.
As you may remember from the “Getting started with Docker” post, the CMD instruction has three forms: CMD ["executable","param1","param2"], CMD ["param1","param2"] (as default parameters to ENTRYPOINT) and CMD command param1 param2 (shell form). The one in our Dockerfile, CMD ["/api/plumber.R"], is of the second type, the ENTRYPOINT parameter(s) form in which "/api/plumber.R" is passed to the plumber deployment function.
In addition to the base layer image name “rstudio/plumber”, we can specify the version by adding a tag. For example, “rstudio/plumber:latest” for the latest version of the image.
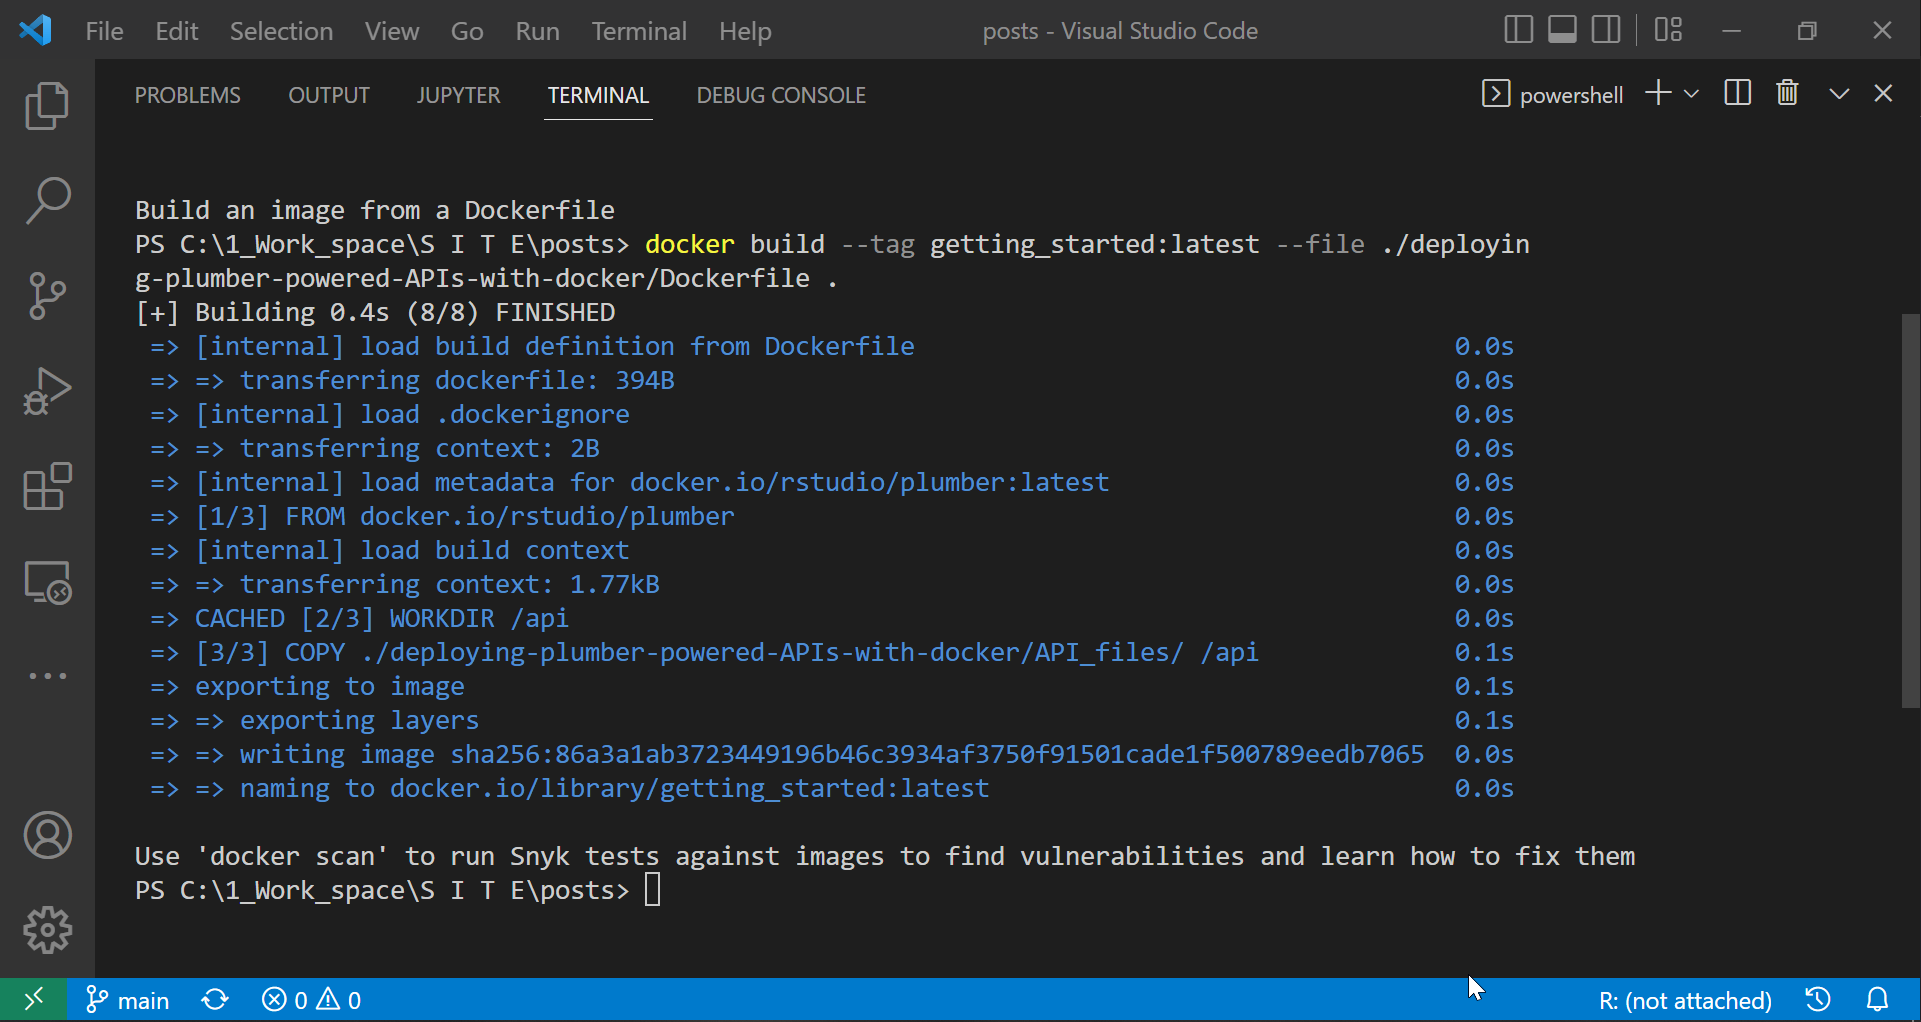
Building a docker image using a dockerfile:
As we saw in the previous docker post, we can build a docker container by using the docker build command. The options (or flags) of the docker build command (or the build child command to be specific) we used are:
- –tag: which allows us to name, and optionally tag, the image in the “name:tag” format (for example: –tag getting_started:latest),
- –file: which allows us to point docker to the “relative path” of the dockerfile that we want it to use to build the image, and
- . (the dot): This lets docker know that the “path” of the files we want to use is the local folder from where we are executing the command. The difference between this dot and the one we referred to in the dockerfile is the context in which it is being used. In the build command, docker expects a path in the host’s storage.
1
docker build --tag getting_started:latest --file ./deploying-plumber-powered-APIs-with-docker/Dockerfile .
 |
|---|
| Building a docker image from a dockerfile |
We can replace the --tag with the -t flag. However, we recommend using --tag with the docker build command to avoid confusion with the -t flag used with docker run.
On a different note, one popular naming convention is to add the user name to the desired image name, for example “USERNAME/name:tag”.
The --file flag is not required if the “Dockerfile” is located in the host’s working directory (indicated by the path displayed in the terminal); in such situations, a dot “.”, which refers to the current working directory, can be used.
Running a docker container:
To run (or host locally) a docker container, we use the command docker run, which has the following options (or flags):
- -p: or “–publish” publishes one or more docker container port(s) to the host machine allowing access to the containerised application (for example: below, we bind port 8080 from the host to 8000 from the container).
- -itd: which is a shorter way to write the three flags:
- i: or “–interactive” which, according to the docker documentation, “Keep STDIN open even if not attached”. Put simply, it enables the container to read inputs from our terminal/console and react or present output to it.
- t: or “–tty” which allocates a pseudo-TTY (“tells Docker to allocate a virtual terminal session within the container”).
- d: or “–detach” which runs the container in the background (freeing the console window we are using without killing or stopping the container).
- –restart: which sets what the container should do when it exits. Below we set this to “unless-stopped” so that the container would restart if it exited because of an error unless we stop it. We can not use this command with the –rm command (which automatically removes the container when it exits).
- –name: which allows us to give the instance of the image (the container) we are about to run a name. This name will consequently allow us to
start,stop,kill, orremovesaid container. - image: the name, or name:tag, of the image from which we want docker to instantiate a container.
1
docker run -p 8080:8000 -itd --restart=unless-stopped --name first_one getting_started
 |
|---|
| Running a docker container |
The –name flag is optional, and docker will assign a random name to the image instance it runs if you did not provide one. However, naming your container is a good practice and would ease your subsequent interactions with said container. Therefore, as we will see in the following few sections, we will refer to the said container using its name when executing the docker subcommands.
On a similar note, the container name is not the only way to refer to it. For example, docker spits out a container ID immediately after the docker run command, which we can use with other docker subcommands to refer to said container.
We recommend you play around with the options of the child commands we used in this tutorial. Then, try running the same commands without these flags and observe the difference in the interactions you have or can have with the container.
Interacting, stopping and removing a docker container:
Interacting with a running docker container:
Let us confirm that our container is now running before we interact with it. One easy way to check what containers are running is to run the docker ps command (the ps in the command is short for processes).
1
docker ps
This command lists some information about the docker containers running locally, and by adding the -all or -a flag, docker reports on all containers, including those available locally but not running.
1
docker ps -a
If we were interested in only seeing the container(s) ID(s), we should add the -q or --quiet flag.
1
docker ps -a -q
Jumping into the command line of a running docker container:
Now that we have successfully run (or host) our docker container locally, let us jump into its terminal and run some commands. Below we use docker exec command to execute a command in a running container. The options we used with the exec subcommand are:
- -it: are the same as in the
runchild command (ordocker run) above. - CONTAINER: is the name of the container we want docker to execute the command in (“first_one” in this example). We can use the container ID (which docker prints in our terminal following a successful
docker runcommand). - COMMAND: is the command we want docker to execute in the CONTAINER we named earlier (“/bin/bash” in the code chunk below).
- ARG: which are the arguments associated with or required for the COMMAND we specified earlier (The bash4 shell did not need arguments in this example)
1
docker exec -it first_one /bin/bash
After running the code above in our Command Prompt, we should see:
- a terminal window listening to our inputs from within the running CONTAINER “first_one”, or
- that the current terminal has jumped from the existing working directory to the working directory (“/api”) of the running container (for example: in the following gif, we can see that the terminal jumped from
PowerShelltodocker, and from the current directory toroot@CONTAINER_ID:/api).
We can directly interact with the API we copied into the “first_one” container the same way we would interact with it if we published it on our host machine (see this post for more on interacting with locally hosted APIs).
1
curl "http://localhost:8000/echo?userName=Wael"
Notice that since we exposed or published port 8000 from the container to port 8080 from the host (our machine), we need to use port 8080 to be able to communicate with our API from the host. However, the port we employ in the above curl command is the container’s 8000, which can only work from within the running container.
 |
|---|
| Interacting with the running container’s terminal |
Communicating with the exposed port of the running docker container:
As we mentioned just a few lines ago, we can successfully run the same curl command from the host using port 8080, as shown in the following code chunk.
1
curl "http://localhost:8080/echo?userName=Wael"
 |
|---|
| Interacting with the running container via the exposed port |
To reiterate, notice that, unlike the earlier curl command, we have accessed the host’s port 8080, not the container’s 8000. Well, to be clear, this curl command is executed in the host’s terminal, not the container’s shell.
Stopping a docker container:
One of the commands that come in handy when testing docker containers is the stop child command which tells docker to stop one or more running container(s). The options that we would typically use with the docker stop command are:
- -t: (or –time) which is the number of seconds to wait for the child command
stopto finish stopping the container before docker kills it (we are not using this option in the following example). - CONTAINER: the name of the container we want to stop (“first_one” in this example). We can use the container ID (which docker prints in our terminal following a successful
docker runcommand)
1
docker stop first_one
 |
|---|
| Stopping the running docker container |
If we told docker to show us its running process using the docker ps command (following the stop subcommand), we would not see the “first_one” container in the returned list. However, we can still see it if we ask docker to show us all existing containers using the -a flag with the ps subcommand.
Removing a docker container:
Now that we have finished testing our API, we can use the docker rm command to clean up our machine of the container we created earlier.
1
docker rm first_one
 |
|---|
| Removing the docker container we just stopped |
Removing a docker image:
To remove the image itself, we can use the docker rmi command, which takes an image name (“getting_started” in this case), as opposed to the rm command, which takes a container name.
1
docker rmi getting_started
The local image can also be removed by calling either of the following commands.
1
2
docker image remove getting_started
docker image rm getting_started
Conclusion:
In this post, we managed to script a docker image to host our API, built that image, instantiated a copy, and interacted with our API through the hosting container. We also dissected the commands we used throughout this tutorial to understand better how to tailor them to our future projects.
We can consider this post as a proof of concept that our API works fine in a docker container, and we can thus deploy it via docker over one or more of the many options in the containers deployment ecosystem. With this in mind, we dare to point you, the reader, to other posts in which we do just that.
Sources:
- Getting started with docker.
- Getting started with plumber.
- Docker 101: Fundamentals and Practice.
- Docker child commands.
Smith RA, Schneider PP and Mohammed W. Living HTA: Automating Health Economic Evaluation with R. Wellcome Open Res 2022, 7:194 (https://doi.org/10.12688/wellcomeopenres.17933.2). ↩
RStudio and Visual Studio Code (aka VS code) are integrated development environments (IDE)s. RStudio is, at least in my opinion, the best IDE for R, whereas VS code has several great extensions, including a few for docker. ↩ ↩2
Container orchestration automates the deployment, management, scaling, and networking of containers.
Bash is a Unix shell and command language